Introduction
mserve (Music Server) is firstly a Music Player that entertains with animated graphics, VU meters and scrolling lyrics. Secondly, it encodes CDs with track titles and artwork automatically obtained from MusicBrainz. Finally, mserve automatically downloads lyrics scores from the internet. Lyrics score lines are synchronized by simply clicking each line as it is sung.
Take a quick peek at one of the many merve videos on this website.
Features
mserve has regular features you would expect. This section lists some unique features you might not expect.
Innovative Features Most Applications Don’t Have:
- Help buttons in mserve bring you directly to this web page and scroll to the appropriate section
- Synchronize files across multiple locations, including sleeping hosts that are woken up and kept awake as long as necessary
- Information Centre displays history of messages, statuses and actions
- Tooltips appear after time delay, fade in/out, and follow mouse pointer
- Basic Lyrics Time Synchronization and Advanced Lyrics Time Synchronization (Synchronized lyrics lines are stored in a Time Index list and this term is frequently used)
- Two timers for playing music during TV broadcast commercials
- Written in relatively easy to learn Python so you can modify for Linux, Windows WSL, Chrome OS, Windows (a lot more work) and Mac (modest amount of more work)
- Centralized SQL Database shares lyrics score and time index across all locations for conformity and reduced storage space.
- Make LRC (
.lrc- synchronized lyrics) file for other music players. - Proprietary data dictionary technology to quickly view SQL table rows and even rearrange columns.
- A Dashboard tracks every Python Module in mserve and automatically changes when the Pippim Website is refreshed.
Features Most Music Players Don’t Have:
- Album Artwork animations and VU Meters during playback
- Album Artwork alternate hi-resolution images automatically displayed
- Album Artwork at pixel 3,3 coordinates, sets a different color theme, during song playback (resizing window can result in different color theme)
- Define image file for songs with no artwork.
- Scrolling lyrics score during playback (automatically web scraped)
- Two clicks to rename Artists, Albums and Song files in both the storage device and the mserve SQL database at the same time.
- Granular remote host tests when location opened for playing or synchronization.
- Encode CD to music files in MP3, MP4, FLAC, WAV and OGA format as this sample video demonstrates
- Scrape MusicBrainz.org ⧉ 🔗 for Artist / Album CD track details and artwork
- Scrape genius.com ⧉ 🔗 and other websites to get song lyrics
- Text search function returns results with each keypress.
- Restores file’s OS last access time to original if less than 80% of song was played
- Updates play count and last play time, if 80% of song played
- Cross-fading other sound sources when toggling play/pause, FF/REW, and during TV broadcast commercials
- Show/Hide Chronology to balance screen real estate. The “Chronology” can also be referred to as the “Song Queue” in other music players.
Multiple Everything
mserve remembers and restores positions and sizes for multiple windows plus a whole lot more.
- Multiple Locations Music File Synchronization (including mobile phones and file servers)
- Multiple Playlists per location
- Multiple Window save positions for music location tree, current playing, volume control, playlists control, fine-tune time index, location maintenance, three SQL Table viewers, and CD encoding (ripping)
- Multiple processes for lag free animations
- Multiple animations for artwork; spin, slide and pixelate
- Multiple VU meters displaying sound level; left and right
- Multiple Show Chronology/Resume Song/Volume/Playlist Buttons states per Playlist per location
- Multiple sound level fade methods for pause/play, switch sound source between TV and mserve, fine-tune lyrics time index, etc.
- Multiple CD Encoding formats, quality, images and filename formatting
- Multiple MusicBrainz CD album/track releases to chose from for artist
- Multiple Website Scraping for Lyrics is in progress but currently
defaults to
genius.com
Under Construction

mserve is still under construction. Installation requires
manually downloading files from GitHub and installing any
missing dependencies with apt get install in Debian/Ubuntu
or pip install on other Operating Systems.
See the required dependencies for mserve section for more details. For typical power users, many of the dependencies will already be installed.
IMPORTANT NOTES:
mserve was primarily tested with Linux, specifically Ubuntu 16.04 LTS and Python 2.7.12.
mserve was briefly tested with ChromeOS for about a month and modified.
You “should” be able to toggle between Pyhon 2.7.x and Python 3.x by changing the “shebang” at the top of each
.py. Currently, mserve “should” run with the default Python version. Testing on Python 3.x will begin prior to next major mserve upgrade.Current plans are to upgrade to Ubuntu 24.04 LTS and Python 3.12 in year 2024. A “lite” Ubuntu 16.04 version running Unity may be created as some sort of virtual machine. It’s already been announced that Ubuntu 24.04 (via Debian) will not ship with Python 2.7 anymore.
mserve Installation
mserve (Music Server) is written in Python.
The main program is called mserve.py and can be found in the
mserve GitHub Repository ⧉ 🔗.
Copy all
files in the GitHub src folder to a new directory on your machine.
For example, <HOME>/mserve for Linux, Mac, Chrome OS or
Windows Subsystem for Linux (WSL). Unless you are running Ubuntu 16.04
LTS under Extended Security Maintenance (ESM), you will have to make
changes to mserve.py and the programs it calls.
For Windows, the installation directory would be <HOME>\mserve
As of June 8, 2026
mserve will not run under Windows without modification.
mserve.py is called with m from the command line or a
desktop shortcut. It is recommended you start using mserve
from the command line to see any error messages that might
appear.
m is a wrapper Python script that centers
a logo on your screen for a moment while mserve
is loaded into memory. Using m instead of mserve.py
speeds up loading because mserve.pyc is automatically
called and it is half the size. As of August 30, 2023,
the former is 765 KB and the latter is 409 KB.
m and mserve.py do not need to be added to your path.
You can call them with /path/to/m or /path/to/mserve.py
from the command line. If you followed the installation tip
above, it would be <HOME>/mserve/m for Linux-like machines,
or <HOME>\mserve\m for Windows. As of August 30, 2023,
mserve will not run under Windows without modification.
Table of Contents
- Introduction
- Music Location Tree
- Automatic Skin Color Based on Artwork
- CD Encoding
- Python Modules Dashboard
- Windows Open Where You Want Them
- Tooltips Gradually Fade In and Out
- Lyrics Synchronization
- Hide/Show Chronology
- Locations
- Playlists
- Hockey TV Commercial Buttons
- VU Meters
- Tools Dropdown Menu Examples
Music Location Tree
The Music Location Tree is the main window which appears when mserve starts up and it remains until mserve is closed. On startup, all files in the Music Location Tree are rediscovered. New songs since the last time are displayed.
Songs are stored under collapsed Album Names which, in turn, are stored under collapsed Artist Names. The directory format must be:
Artist Name/Album Name/Song Name.ext
Only Song Filenames with a music type extensions are included. For
example, extensions of .flac, .mp3, .m4a, .oga, .wav, etc,
are included.
Here is a sample window with currently playing song highlighted in green.
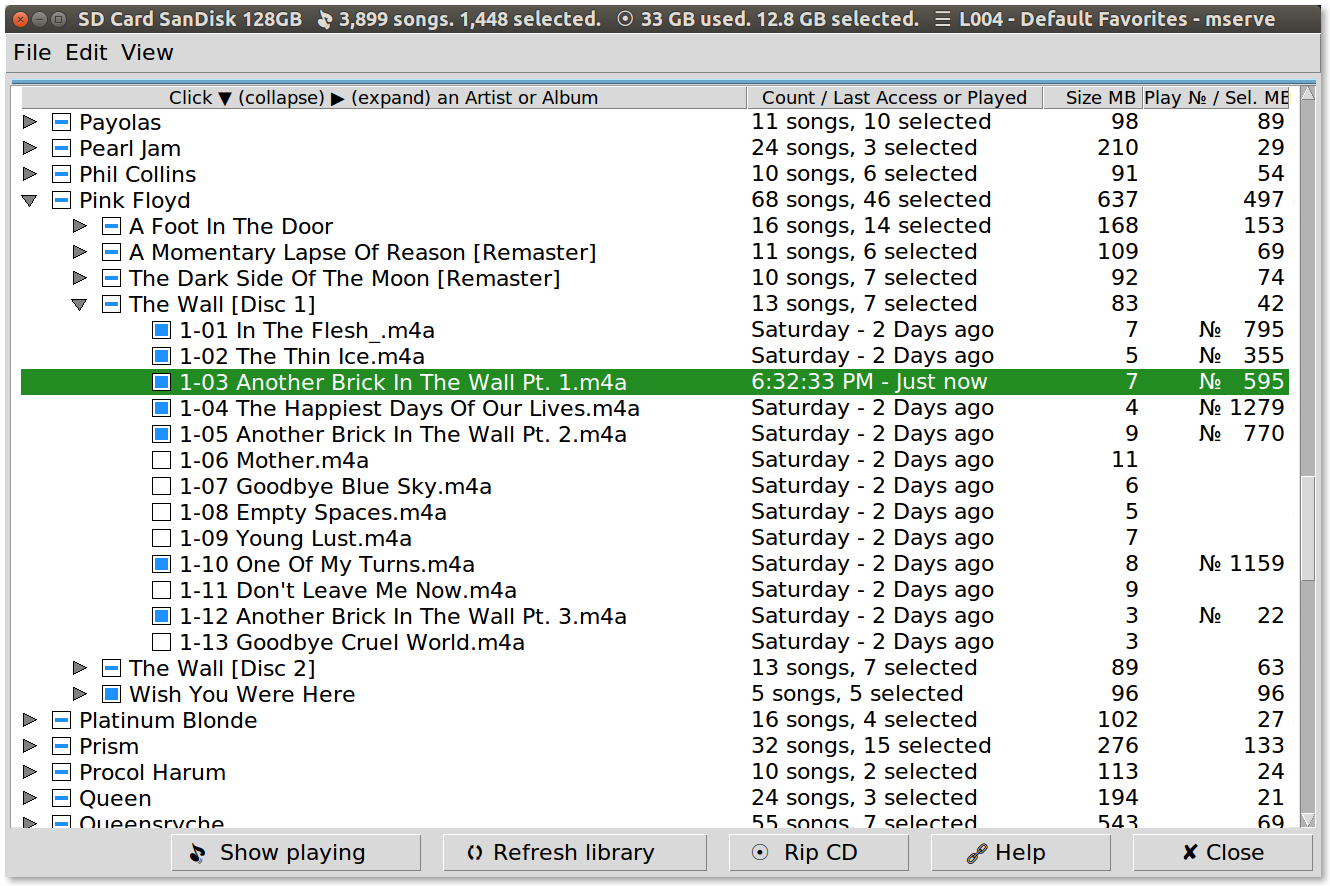
The first three Artists are “collapsed” which is indicated by the “▶” chevron (A.K.A. “right triangle). When you click the “▶” chevron the Artist is opened and the “▼” chevron is displayed to indicate the Artist is opened. The same chevrons and used for Albums. As songs play and end in mserve, the Album Name and Artist Name are automatically expanded and collapsed to show the green highlight bar.
TIP: Double-click on an Artist or Album to expand and collapse entries underneath.
Songs have a checkbox which are clicked to include or exclude in playlists. The check box is colored solid when “checked” and is hollow when “unchecked”. If a line appears, it indicates the Artist or Album is “tri-state”. This means some songs below are “checked” and some are “unchecked”.
You can check and uncheck individual songs, entire Artists or, entire Albums.
As you check and uncheck individual songs, or entire Artists or, entire Albums a list is built in memory. Then you can Apply or Cancel changes.
New songs are added into the Chronology (Playlist) after the current playing song position.
If you make huge mistakes you can abandon changes with the option “Exit without saving Playlist”.
The Music Location Tree window follows the directory structure of your storage device:
- The top level points to “My Music”
- The second level points to Artists under “My Music”
- The third level points to Albums under each Artist
- The fourth level points to Songs under each Album
NOTE: “My Music” is an over simplification for the sake of example. You can start
m(the splash screen for mserve.py) by typing:m "/mnt/music/Users/Person/Music/iTunes/iTunes Media/Music/"You can also call
mafter changing to a music directory. E.G. Type:cd ~/Music/Pink Floydand press Enter . Then type:m .and press Enter . Note the.specifies the current directory andmmust be in your current path. mserve will open and display all the Albums for Pink Floyd.If you don’t pass a parameter to
mit will reload the last location used and continue playing favorites from where it left off.
Dropdown Menus
The top-left corner of the Music Location Tree window contains four dropdown menus; File, Edit, View and Tools. Click on the name and the dropdown menu options appear:
File Dropdown Menu
Some options will be disabled out when they are not applicable. For example, the Save Playlist and Close Playlist options are disabled (greyed out) until a Playlist is opened.
- Open Location and Play - Open a predefined location. If the location is a sleeping host, it is woken up and tested.
- New Location - Define a new location where music can be found. Locally or remotely on a host such as a file server or mobile phone.
- Open Playlist - Open an existing playlist within the current location.
- New Playlist - Define a new playlist within the current location.
- Save Playlist - Save song selection changes made to Playlist.
- Close Playlist and Use Favorites - Favorites are the songs which are selected when no Playlist are open. Favorites do not require the SQL database but still use it for metadata information.
- Save Favorites - Save song selection changes made to Playlist.
- Exit and CANCEL Pending - (disabled until changes are made)
- Save Play and Exit - Pending changes to song selections are applied to Playlist or Favorites and mserve exits.
Edit Dropdown Menu
- Synchronize Location - Compare current location to another location and synchronize files based on date, size and file byte differences. Uses shadow file system for mobile phones that do not track files’ last modification time.
- Edit Location - Edit a predefined location. If it’s the currently opened location, changes to the Top Directory are not permitted.
- Delete Location - Delete a predefined location. The currently opened location cannot be deleted.
- Rename Playlist - Rename a predefined playlist without changing it’s catalog of songs or any other details.
- Delete Playlist - Delete a predefined playlist. Song selected in the playlist are not touched.
- Volume During TV Commercials - Television broadcasts on the internet are often at a lower volume than mserve. Use this function and it’s volume slider to set mserve volume when it is playing during TV Commercials which automatically muted by mserve.
View Dropdown Menu
- Information Centre - Displays history of messages mserve has shown along with key statistics, actions and events. Besides using the dropdown menu option, the light blue ruler below the dropdown menus can be clicked to open the Information Centre.
- View Locations - View predefined locations.
- View Playlists - View predefined playlists.
- Enable FF/Rewind Buttons - Remove TV Commercial and Intermission buttons and replace with FF/Rewind buttons.
- SQL Music Table - Scroll through all songs for all locations that mserve has discovered. “Drill-down” to view more details. Buttons to select specific rows, search text, and update Metadata without having to play each song first.
- SQL History Table - Scroll through history rows. “Drill-down” to view more details. Buttons to select specific rows and search text.
- SQL Location Table - Scroll through location rows. Button to search text. This function is inferior to the View Locations function mentioned above.
NOTE: The three SQL views allow the column to be moved. Click and hold the heading to drag the column to a different position.
Tools Dropdown Menu
Sample videos for the Tools Dropdown Menu are available below with detailed explanations.
- Enable TV Commercial Buttons - Remove FF/Rewind buttons and replace with TV Commercial and Intermission buttons.
- Enable FF/Rewind Buttons - Remove TV Commercial and Intermission buttons and replace with FF/Rewind buttons.
- Big Number Calculator - Indispensable calculator for math equations using MB (Megabytes), GB (Gigabytes), TB (Terabytes), etc.
- Make LRC For Checked Songs - will create an LRC (
.lrc- synchronized lyrics) file for every checked song in the Music Location Tree. This only applies to songs that have a lyrics score web scraped and where you have clicked on 80% of the lines to synchronize them. - Copy Checked To New Location - will copy both the LRC (
.lrc- synchronized lyrics) file AND every checked song in the Music Location Tree. If there is no LRC file, the original music file is still copied. The new location must be empty. For locations already containing music, the synchronize location function must be used instead. That ensures the correct direction for copying files. To update LRC files in locations already containing music, use Open Location and Play, then use the Make LRC For Checked Songs option. - Debug Information - Displays information to console and to the
Information Centre. This information is helpful to those customizing
mserve. Moves lost windows into monitor! If an application
window is off the desktop (invisible), it is moved half way into
the closest desktop monitor. Also note that 18 minutes after booting,
4
speech-dispatcherjobs may appear in pulse audio. A dialog box prompt message appears and, jobs are killed if you respondYes. - Volume submenu - Displays the Volume submenu which contains options for Volume Loudness Normalization. The options are Pulse Audio, Analyze Maximum Volume, Analyze ‘loudnorm’ Filter, Update ‘loudnorm’ Filter, Analyze New Maximum Volume, and Create New Volume Playlist.
- Repair Last Access - Repairs the Last Access Time for music song files. There are some applications that scan music files and reset the time to the current time.
NOTE: The Enable TV Commercial Buttons and Enable FF/Rewind Buttons dropdown menu options occupy the same menu line and replace each other when they are clicked. The button selection only effects the the current Playlist. Other locations and playlists maintain their own button selection.
Right-Click Popup Menus
In all mserve windows, you can move the mouse over rows and they are highlighted. You can right click on a row for a context-sensitive popup menu.
When an Artist, Album or Song line in the Music Location Tree window is right-clicked, a context-sensitive popup menu appears. The context-sensitive popup menu changes depending on the line type, which is why it is called “context-sensitive”.
Artist or Album Right-Click Popup Menu
When you click on an Artist or Album, it is expanded and entries beneath are highlighted in yellow. The yellow highlighted entries is a reminder of what will be effected by the next action.
Menu Options:
- Collapse List - Yellow highlight is removed, entries beneath the Artist or Album are collapsed, and the pop-up menu is removed.
- Rename Artist - Rename the artist, only appears when artist clicked.
- Rename Album - Rename the album, only appears when album clicked.
- Open Kid3 Audio Tagger - Use Kid3 to set Metadata tags.
- Open Nautilus File Manager - Use File Manager to view directory.
- Ignore Click - Remove yellow highlight, list remains expanded, and pop-up menu is removed. Popup menu can also be closed by moving mouse out-of-menu and clicking.
Song Right-Click Popup Menu
When you highlight and right click a song in the Music Location Tree, a context-sensitive popup menu appears.
Menu Options:
- Sample Middle 10 Seconds - Listen to middle ten seconds of song.
- Sample Whole Song - Listen to the whole song.
- Rename Song Title - Rename the song title.
- Open Kid3 Audio Tagger - Use Kid3 to set Metadata tags.
- Open Nautilus File Manager - Use File Manager to view directory.
- Make LRC file - Make synchronized lyrics file for other music players. File created in same album directory as the music file.
- View Raw Metadata - View metadata values returned by
ffprobewhich uses common tag names. - View SQL Metadata - View metadata in pretty format from the SQL Music Table inside mserve.
- Ignore Click - Close popup menu. Popup menu can also be closed by moving mouse out-of-menu and clicking.
Information Centre
Just like other applications, mserve uses dialog boxes to display:
- Status messages
- Information messages
- Warning messages
- Error messages
- Confirmation messages with “Proceed” / “Cancel”
However, unlike other applications, mserve also records these in the Information Centre for the duration of your session.
Additionally mserve records system events and user actions where there was no dialog box presented.
The Information Centre is accessed from the Music Location Tree window’s View dropdown menu. It can also be accessed by clicking the light blue thin ruler near the top of the window, as the video below illustrates.
Information Centre Sample Video
Music Location Tree Help Button
mserve windows contain “Help” buttons that:
- Open a new web browser window
- Open this web page
- Navigate down to the appropriate section on the web page
Help Button Sample Video
Help Button Sample Video Highlights
- The options for File, Edit and View dropdown menu are shown
- The mouse hovers over button bar at bottom of window
- Tooltips for buttons appear after a short delay
- Tooltips gradually fade in, remain a short period, then gradually fade out
- The Help button is clicked and results appear
Debug Information
Sample Debug Information
  ######################################################
 //////////////                            \\\\\\\\\\\\\\
<<<<<<<<<<<<<<    mserve - Music Server     >>>>>>>>>>>>>>
 \\\\\\\\\\\\\\                            //////////////
  ######################################################
                    Started: 2:15 PM
FUSE library version: 2.9.4
using FUSE kernel interface version 7.19

global_variables.py (g) - Machine Information
==========================================================================================

g.OS_PLATFORM     : Linux-4.14.216-0414216-generic-x86_64-with-Ubuntu-16.04-xenial
g.OS_NAME         : Linux
g.OS_VERSION      : 4.14.216-0414216-generic
g.OS_RELEASE      : #202101171339 SMP Sun Jan 17 13:56:04 UTC 2021
g.USER            : rick
g.USER_ID         : 1000
g.HOME            : /home/rick
g.USER_CONFIG_DIR : /home/rick/.config/mserve
g.USER_DATA_DIR   : /home/rick/.local/share/mserve
g.MSERVE_DIR      : /home/rick/.local/share/mserve/
g.PROGRAM_DIR     : /home/rick/python/
g.TEMP_DIR        : /run/user/1000/
g.MSERVE_VERSION  : 3.5.0
SQL PRAGMA Version: 3

Python Version    : 2.7.12 (default, Nov 20 2023, 15:01:59)  [GCC 5.4.0 20160609]
Sqlite3 Version   : 3.11.0
TK Version        : 8.6
Pillow Version    : 3.1.2
PIL Version       : 1.1.7

PulseAudio Version: pulseaudio 8.0
ffmpeg Version    : 7.0.1-static https://johnvansickle.com/ffmpeg/
ffplay Version    : 2.8.17-0ubuntu0.1+esm7
ffprobe Version   : 7.0.1-static https://johnvansickle.com/ffmpeg/

xdotool Version   : xdotool version 3.20150503.1
wmctrl Version    : 1.07
pqiv Version      : 2.2
kid3 Version      : kid3 3.3.1
nautilus Version  : GNOME nautilus 3.14.3
nmap Version      : Nmap 7.01 ( https://nmap.org )
SSH Version       : OpenSSH_7.2p2 Ubuntu-4ubuntu2.10+esm5, OpenSSL 1.0.2g  1 Mar 2016
sshfs Version     : SSHFS version 2.5
fusermount Version: fusermount version: 2.9.4
wakeonlan Version : /usr/bin/wakeonlan version 0.41 calling Getopt::Std::getopts ...

Distributor ID:	Ubuntu
Description:	Ubuntu 16.04.7 LTS
Release:	16.04
Codename:	xenial
xrandr program version       1.5.1
Server reports RandR version 1.5

mon = monitor.Monitors()
==========================================================================================

mon.screen_width x mon.screen_height: 5790 x 3240

Number of monitors - mon.monitor_count: 3
for m in mon.monitors_list: -- self.debug_detail(' ', m):
  Monitor(number=0, name='HDMI-0', x=0, y=0, width=1920, height=1080, primary=False)
  Monitor(number=1, name='DP-1-1', x=1920, y=0, width=3840, height=2160, primary=False)
  Monitor(number=2, name='eDP-1-1', x=3870, y=2160, width=1920, height=1080, primary=True)

Primary Monitor - mon.primary_monitor:
   Monitor(number=2, name='eDP-1-1', x=3870, y=2160, width=1920, height=1080, primary=True)

Active Window Tuple -  active_win = mon.get_active_window():
  active_win.number   : 75497552
  active_win. WxH+X+Y : 1461 x 853 + 2755 x 60
  active_win.name     : SD Card SanDisk 128GB   🎵 3,919 songs. 1,441 selected.   �

Active Monitor - mon.get_active_monitor():
   Monitor(number=1, name='DP-1-1', x=1920, y=0, width=3840, height=2160, primary=False)

sys.getfilesystemencoding() UTF-8

Open Windows (Wnck) - mon.get_all_windows():
==========================================================================================

Window(number=46137346L, name='conky (alien)', x=5350, y=24, width=410, height=1392)
Window(number=65011714L, name='XdndCollectionWindowImp', x=-5890, y=-3340, width=5790, height=3240)
Window(number=65011721L, name='unity-launcher', x=-165, y=-1156, width=65, height=1056)
Window(number=65011742L, name='unity-panel', x=0, y=0, width=1920, height=24)
Window(number=65011749L, name='unity-panel', x=1920, y=0, width=3840, height=24)
Window(number=65011756L, name='unity-panel', x=3870, y=2160, width=1920, height=24)
Window(number=65011763L, name='unity-dash', x=-1343, y=-780, width=1243, height=680)
Window(number=65011764L, name='Hud', x=-420, y=-300, width=320, height=200)
Window(number=62914570L, name='Desktop', x=0, y=0, width=5790, height=3240)
Window(number=62918548L, name='L004', x=3870, y=2195, width=1369, height=628)
Window(number=81789286L, name='mserve', x=2257, y=363, width=1300, height=902)
Window(number=83886131L, name='Multiple Monitors Manager - mmm', x=2059, y=240, width=1447, height=838)
Window(number=10485837L, name='mserve \xe2\x80\x93 ~/python/mserve.py', x=2718, y=622, width=1518, height=1523)
Window(number=81792024L, name='Python1', x=2259, y=1269, width=1300, height=874)
Window(number=81792281L, name='Python3', x=2061, y=42, width=3274, height=366)
Window(number=10490282L, name='website \xe2\x80\x93 mserve.md', x=3938, y=823, width=1377, height=1327)
Window(number=100663307L, name='Mozilla Firefox', x=4015, y=2253, width=1775, height=987)
Window(number=100663338L, name='Kennedy teams up with Trump. Elensky talks down to Modi. Donbass collapsing, Ukraine stuck in Kursk - YouTube \xe2\x80\x94 Mozilla Firefox', x=0, y=0, width=1920, height=1080)
Window(number=63181825L, name='rick Properties', x=5266, y=2372, width=516, height=476)
Window(number=75497552L, name='SD Card SanDisk 128GB\xe2\x80\x83\xe2\x80\x83\xe2\x80\x83\xf0\x9f\x8e\xb5 3,919 songs.\xe2\x80\x831,441 selected.\xe2\x80\x83\xe2\x80\x83\xe2\x80\x83\xf0\x9f\x96\xb8 33.3 GB used.\xe2\x80\x8312.8 GB selected.\xe2\x80\x83\xe2\x80\x83\xe2\x80\x83\xe2\x98\xb0 L004 - Default Favorites - mserve', x=2755, y=60, width=1461, height=853)
Window(number=75501105L, name='Playing Favorites - mserve', x=3605, y=358, width=1704, height=865)

Saved Geometry for Windows - sql.Config.print_windows():
==========================================================================================

'Action':calculator	Window Name:Big Number Calculator Window
	'SourceMaster':	460x248+5273+2206
	'SourceDetail':	saved on exit, loaded on starting
	'Comments':	Used in conjunction with 'screen' History Record Id #
'Action':encoding	Window Name:CD Encoding (Ripping) Window
	'SourceMaster':	1713x738+2257+278
	'SourceDetail':	saved on exit, loaded on starting
	'Comments':	Used in conjunction with 'screen' History Record Id #
'Action':history	Window Name:Lyrics Scraping History Window (Future Use)
	'SourceMaster':	2128x697+2060+1187
	'SourceDetail':	saved on exit, loaded on starting
	'Comments':	Used in conjunction with 'screen' History Record Id #
'Action':lcs_top	Window Name:DELETE this SQL record
	'SourceMaster':	1268x730+3354+189
	'SourceDetail':	saved on exit, loaded on starting
	'Comments':	Used in conjunction with 'screen' History Record Id #
'Action':library	Window Name:Music Library Window (Main mserve Window)
	'SourceMaster':	1461x785+2755+60
	'SourceDetail':	saved on exit, loaded on starting
	'Comments':	Used in conjunction with 'screen' History Record Id #
'Action':location	Window Name:DELETE this SQL record
	'SourceMaster':	1113x756+3087+182
	'SourceDetail':	saved on exit, loaded on starting
	'Comments':	Used in conjunction with 'screen' History Record Id #
'Action':locations	Window Name:Locations Maintenance Window
	'SourceMaster':	1239x768+4005+77
	'SourceDetail':	saved on exit, loaded on starting
	'Comments':	Used in conjunction with 'screen' History Record Id #
'Action':playlist	Window Name:Music Playing Window
	'SourceMaster':	1704x837+3605+358
	'SourceDetail':	saved on exit, loaded on starting
	'Comments':	Used in conjunction with 'screen' History Record Id #
'Action':playlists	Window Name:Playlists Maintenance Window
	'SourceMaster':	1413x658+2908+199
	'SourceDetail':	saved on exit, loaded on starting
	'Comments':	Used in conjunction with 'screen' History Record Id #
'Action':pls_top	Window Name:DELETE this SQL record
	'SourceMaster':	1183x493+3144+53
	'SourceDetail':	saved on exit, loaded on starting
	'Comments':	Used in conjunction with 'screen' History Record Id #
'Action':results	Window Name:DELETE this SQL record
	'SourceMaster':	2086x720+2180+1246
	'SourceDetail':	saved on exit, loaded on starting
	'Comments':	Used in conjunction with 'screen' History Record Id #
'Action':sql_history	Window Name:View SQL History Table Window
	'SourceMaster':	1868x866+3050+217
	'SourceDetail':	saved on exit, loaded on starting
	'Comments':	Used in conjunction with 'screen' History Record Id #
'Action':sql_location	Window Name:View SQL Locations Table Window
	'SourceMaster':	1920x847+3298+337
	'SourceDetail':	saved on exit, loaded on starting
	'Comments':	Used in conjunction with 'screen' History Record Id #
'Action':sql_music	Window Name:View SQL Music Table Window
	'SourceMaster':	1871x830+2815+143
	'SourceDetail':	saved on exit, loaded on starting
	'Comments':	Used in conjunction with 'screen' History Record Id #

TOOLTIPS - tt.line_dump()
==========================================================================================

Tooltips Line Dump - 26 Tip Dictionaries
Tip#  Suf.  Name - Text
====  ====  ==============================================================================
#  1  9040  button  -  ▼ ▲ ▼ ▲  Expanding/Collapsing Information Centre  ▲ ▼ ▲ ▼
            .140097342574176.140097341968464.140097341968824.140097341969040
#  2  3120  Cancel  -  Cancel changes. Playlist remains unchanged.
            .140097342574176.140097341968464.140097340302256.140097340303120
#  3  2800  Apply  -  Temporarily update changes to playlist in memory.
            .140097342574176.140097341968464.140097340302256.140097340332800
#  4  6448  ▶  Play  -  Lift music queue window up.
            .140097342574176.140097341968464.140097340334024.140097340346448
#  5  7744  🗘 Refresh library  -  Scan disk for songs added and removed.
            .140097342574176.140097341968464.140097340334024.140097340347744
#  6  8968  🖸  Rip CD  -  Encode songs from Audio CD to music files.
            .140097342574176.140097341968464.140097340334024.140097340348968
#  7  0120  ⧉ Help  -  Open new window in default web browser for
            .140097342574176.140097341968464.140097340334024.140097340350120
#  8  0264  ✘ Close  -  Close mserve and any windows mserve opened.
            .140097342574176.140097341968464.140097340334024.140097340470264
#  9  9112  splash  -  Playlist: L004 - Default Favorites
            .140097342574176.140097341968464.140097341969904.140097341969112
# 10  7784  label  -  Speaker with diagonal line.
            .140097342017192.140097342474360.140097338815480.140097338817784
# 11  5192  label  -  Speaker with three waves.
            .140097342017192.140097342474360.140097338815480.140097338815192
# 12  5696  label  -  Volume slider active when music plays:
            .140097342017192.140097342474360.140097338815480.140097338815696
# 13  9096  canvas_button  -  Auto Scrolling lyrics is active.
            .140097342017192.140097342474360.140097339859528.140097339859672.140097339859096
# 14  9600  canvas_button  -  Lyrics line is highlighted using time index.
            .140097342017192.140097342474360.140097339859528.140097339859672.140097339859600
# 15  4488  canvas_button  -  Manual lyrics score scrolling is active.
            .140097342017192.140097342474360.140097339859528.140097339859672.140097339864488
# 16  5712  canvas_button  -  Manual lyrics score scrolling is active.
            .140097342017192.140097342474360.140097339859528.140097339859672.140097339865712
# 17  5352  label  -  x % time:
            .140097342017192.140097342474360.140097339859528.140097339859672.140097339865352
# 18  8656  canvas_button  -  Left-clicking hamburger icon displays a
            .140097342017192.140097342474360.140097339859528.140097339859672.140097339868656
# 19  1176  ✘ Close  -  Close playlist but mserve stays open.
            .140097342017192.140097339868944.140097339871176
# 20  2496   🔀 Shuffle  -  Shuffle songs randomly.
            .140097342017192.140097339868944.140097340472496
# 21  5136  ⏮  Previous  -  Play previous song.
            .140097342017192.140097339868944.140097340305136
# 22  8128  ⏪  -10 sec  -  Rewind song 10 seconds back.
            .140097342017192.140097339868944.140097340388128
# 23  9208  ❚❚ Pause  -  Play music and spin artwork.
            .140097342017192.140097339868944.140097340389208
# 24  1152  +10 sec  ⏩  -  Fast Forward song 10 seconds ahead.
            .140097342017192.140097339868944.140097340391152
# 25  1088  Next  ⏭  -  Play next song in playlist.
            .140097342017192.140097339868944.140097340441088
# 26  4824  🖸 Hide Chronology  -  Hide the chronology playlist below
            .140097342017192.140097339868944.140097339884824

Opened Location
==========================================================================================

lcs.open_code       : L004
lcs.open_name       : SD Card SanDisk 128GB
lcs.open_modify_time: 1693330248.0
lcs.open_image_path : Sandisk 128GB.png
lcs.open_mount_point: MountPoint
lcs.open_topdir     : /media/rick/SANDISK128/Music
lcs.open_host       :
lcs.open_wakecmd    :
lcs.open_testcmd    :
lcs.open_testrep    : 0
lcs.open_mountcmd   :
lcs.open_touchcmd   :
lcs.open_touchmin   : 0
lcs.open_comments   : Works in phone or laptop with Standard Adapter
lcs.open_row_id     : 4

Opened Playlist
==========================================================================================

No Playlist opened

Information Centre - self.info.dict[]
==========================================================================================

--- KEY ---   --- VALUE ---------------------

[time]      : 1724531842.38
[source]    : list[VALUES] on lines below.
  File "./m", line 86, in <module>
    main()

  File "./m", line 80, in main
    mserve.main(toplevel=splash, cwd=cwd, parameters=sys.argv)

  File "/home/rick/python/mserve.py", line 23581, in main
    MusicLocationTree(toplevel, SORTED_LIST)  # Build treeview of songs

  File "/home/rick/python/mserve.py", line 1673, in __init__
    self.load_last_selections()  # Play songs in favorites or playlists

  File "/home/rick/python/mserve.py", line 8175, in load_last_selections
    self.play_selected_list()

  File "/home/rick/python/mserve.py", line 8714, in play_selected_list
    if not self.play_one_song(resume=resume, chron_state=chron_state):

  File "/home/rick/python/mserve.py", line 10174, in play_one_song
    if not self.play_to_end():  # Play entire song unless next/prev, etc.

  File "/home/rick/python/mserve.py", line 10360, in play_to_end
    self.refresh_play_top()  # Rotate art, update vu meter after(.033)

  File "/home/rick/python/mserve.py", line 10449, in refresh_play_top
    self.play_top.update()  # Sept 20 2020 - Need for lib_top too

  File "/usr/lib/python2.7/lib-tk/Tkinter.py", line 1022, in update
    self.tk.call('update')

  File "/usr/lib/python2.7/lib-tk/Tkinter.py", line 1540, in __call__
    return self.func(*args)

  File "/home/rick/python/mserve.py", line 5999, in show_debug
    self.debug_output()

  File "/home/rick/python/mserve.py", line 6436, in debug_output
    collapsed=True, ms_font="TkFixedFont")

[type]      : fact
[severity]  : info
[action]    : open
[text]      :
Opened Playlist
==========================================================================================

No Playlist opened

[text_start]:
[text_end]  :
[patterns]  : []
[collapsed] : True
[font]      : TkFixedFont
[view_time] : 1724531842.38

CURRENT SONG and COMMON VARIABLES
==========================================================================================

self.ndx   : 52  | Song iid: 1303  | 1-09 Dirty White Boy.m4a
tree values: [u'2:15:36 PM - 21 Minutes ago', 8, u'\u2116 \u2007\u200753', u'1724530536.0', 7601167, 1, 220, 7601167, 1, 220]
Artist iid : I08F  | Foreigner  | Album iid: I093  | No End In Sight_ The Very Best Of Foreig
real_path  : /media/rick/SANDISK128/Music/Foreigner/No End In Sight_ The Very Best Of Foreig/1-09 Dirty White Boy.m4a

self.playlist_paths[0]    : /media/rick/SANDISK128/Music/Boston/Boston_ Greatest Hits/05 Don't Look Back.m4a
self.playlist_paths[-1]   : /media/rick/SANDISK128/Music/The Police/The Police [Disc 2]/2-14 Tea In The Sahara.m4a
len(self.playlist_paths)  : 1441  | sys.get size of(self.playlist_paths): 13016

self.saved_selections[0]  : 422  | self.saved_selections[-1]: 3392
len(self.saved_selections): 1441  | sys.get size of(self.saved_selections): 13016

self.chron_attached[] is empty.

self.fake_paths[0]        : /media/rick/SANDISK128/Music/10cc/The Best of 10cc/01 Life Is A Minestrone.m4a
self.fake_paths[-1]       : /media/rick/SANDISK128/Music/White Zombie/Best Of 90s Rock Volume 2 - 20th Century/12 More Human Than Human.m4a
len(self.fake_paths)      : 3925  | sys.get size of(self.fake_paths): 33936

self.real_paths[0]        : /media/rick/SANDISK128/Music/10cc/The Best of 10cc/01 Life Is A Minestrone.m4a
self.real_paths[-1]       : /media/rick/SANDISK128/Music/White Zombie/Best Of 90s Rock Volume 2 - 20th Century/12 More Human Than Human.m4a
len(self.real_paths)      : 3925  | sys.get size of(self.real_paths): 33936

len(SORTED_LIST) Music Location Songs: 3925
len(self.lib_tree.tag_has("Artist")) : 163
len(self.lib_tree.tag_has("Album"))  : 292
len(self.lib_tree.tag_has("Title"))  : 3919

self.Xxx_ctl = FileControl() instances opened
==========================================================================================

Last file accessed - 'ffprobe' (self.play_ctl.metadata):
--------------------------------------------------------

INPUT #0 : mov,mp4,m4a,3gp,3g2,mj2, from '/media/rick/SANDISK128/Music/Foreigner/No End In Sight_ The Very Best Of Foreig/1-09 Dirty White Boy.m4a':
MAJOR_BRAND : M4A
MINOR_VERSION : 0
COMPATIBLE_BRANDS : M4A mp42isom
CREATION_TIME : 2013-04-17T13:05:41.000000Z
TITLE : Dirty White Boy
ARTIST : Foreigner
COMPOSER : De La Rock
ALBUM : No End In Sight: The Very Best Of Foreigner [Disc 1]
GENRE : Rock
TRACK : 9/16
DISC : 1/2
DATE : 1979
COMPILATION : 0
GAPLESS_PLAYBACK : 0
ENCODER : iTunes 11.0.2.26
ITUNSMPB : 00000000 00000840 00000100 0000000000944AC0 00000000 00000000 00000000 00000000 00000000 00000000 00000000 00000000
ENCODING PARAMS : vers
ITUNNORM : 00001E4F 00002119 0000BE96 0000C032 0001CE0A 00032E83 00007E88 00007E88 000184EF 000186BF
ITUNES_CDDB_IDS : 16++
UFIDHTTP : //www.cddb.com/id3/taginfo1.html: 3CD3M103Q162081439U268A8220EC3A6DCAC7C9CEC67F47D21A87CP4
DURATION : 00:03:40.43, start: 0.047889, bitrate: 275 kb/s
AUDIO_RATE : 44100
BIT_RATE : (default)
STREAM #0:0[0X1](UND) : Audio: aac (LC) (mp4a / 0x6134706D), 44100 Hz, stereo, fltp, 270 kb/s (default)
CREATION_TIME(1) : 2013-04-17T13:05:41.000000Z
VENDOR_ID : [0][0][0][0]
STREAM #0:1[0X0] : Video: png, rgba(pc, gbr/unknown/unknown), 225x225, 90k tbr, 90k tbn (attached pic)

GLOBAL VARIABLES
==========================================================================================

START_DIR  : /media/rick/SANDISK128/Music/  | START_DIR.count(os.sep): 5
PRUNED_DIR : /media/rick/SANDISK128/Music/  | PRUNED_COUNT: 0
TV_APP_NAME: Firefox                      | TV_MONITOR: 0
TV_VOLUME  : 87                           | TV_MOVE_WINDOW: True
TV_BREAK1  : 90                           | TV_WINDOW_ANCHOR: center
TV_BREAK2  : 1080                         | TV_MOVE_WITH_COMPIZ: True
ENCODE_DEV : True
REW_FF_SECS: 10                           | REW_CUTOFF: 12
self.get_pending_cnt_total()              : 0
pending_apply() debug print flag DPRINT_ON: False
global_variables.py g.DEBUG_LEVEL         : 0
global_variables.py g.MUSIC_MIN_SIZE      : 100000
global_variables.py g.MUSIC_FILE_TYPES    : ['.aiff', '.caf', '.flac', '.mp3']
	 ['.mp4', '.m4a', '.oga', '.ogg', '.PCM', '.wav']
global_variables.py g.MSERVE_VERSION      : 3.5.0

SQL - Sqlite3 Information
==========================================================================================

SQL Sqlite3 Tables and Indices
---------------------------------------------------------------------------

#: 2  | Table  | Name: Music
	CREATE TABLE Music
		Id INTEGER PRIMARY KEY
		OsFileName TEXT
		OsAccessTime FLOAT
		OsModifyTime FLOAT
		OsChangeTime FLOAT
		OsFileSize INT
		ffMajor TEXT
		ffMinor TEXT
		ffCompatible TEXT
		Title TEXT
		Artist TEXT
		Album TEXT
		Compilation TEXT
		AlbumArtist TEXT
		AlbumDate TEXT
		FirstDate TEXT
		CreationTime TEXT
		DiscNumber TEXT
		TrackNumber TEXT
		Rating TEXT
		Genre TEXT
		Composer TEXT
		Comment TEXT
		Hyperlink TEXT
		Duration TEXT
		Seconds FLOAT
		GaplessPlayback TEXT
		PlayCount INT
		LastPlayTime FLOAT
		LyricsScore BLOB
		LyricsTimeIndex TEXT

#: 3  | Index  | Name: OsFileNameIndex
	CREATE UNIQUE INDEX OsFileNameIndex ON Music(OsFileName)

#: 4  | Table  | Name: History
	CREATE TABLE History
		Id INTEGER PRIMARY KEY
		Time FLOAT
		MusicId INTEGER
		User TEXT
		Type TEXT
		Action TEXT
		SourceMaster TEXT
		SourceDetail TEXT
		Target TEXT
		Size INT
		Count INT
		Seconds FLOAT
		Comments TEXT
		Timestamp FLOAT

#: 6  | Index  | Name: MusicIdIndex
	CREATE INDEX MusicIdIndex ON History(MusicId)

#: 7  | Index  | Name: TimeIndex
	CREATE INDEX TimeIndex ON History(Timestamp)

#: 9  | Index  | Name: TypeActionIndex
	CREATE INDEX TypeActionIndex ON History(Type, Action)

#: 10  | Table  | Name: Location
	CREATE TABLE Location
		Id INTEGER PRIMARY KEY
		Code TEXT
		Name TEXT
		ModifyTime FLOAT
		ImagePath TEXT
		MountPoint TEXT
		TopDir TEXT
		HostName TEXT
		HostWakeupCmd TEXT
		HostTestCmd TEXT
		HostTestRepeat INT
		HostMountCmd TEXT
		HostTouchCmd TEXT
		HostTouchMinutes INT
		Comments TEXT

#: 11  | Index  | Name: LocationCodeIndex
	CREATE UNIQUE INDEX LocationCodeIndex ON Location(Code)


SQL Blacklisted songs
---------------------------------------------------

0 : Compilations/Guardians of the Galaxy, Awesome Mix, Vol. 1/1-01 Hooked on a Feeling.m4a
1 : Compilations/Guardians of the Galaxy, Awesome Mix, Vol. 1/1-02 Go All the Way.m4a
2 : Compilations/Guardians of the Galaxy, Awesome Mix, Vol. 1/1-03 Spirit in the Sky.m4a
3 : Compilations/Guardians of the Galaxy, Awesome Mix, Vol. 1/1-04 Moonage Daydream.m4a
4 : Compilations/Guardians of the Galaxy, Awesome Mix, Vol. 1/1-05 Fooled Around and Fell in Love.m4a
5 : Compilations/Guardians of the Galaxy, Awesome Mix, Vol. 1/1-06 I’m Not in Love.m4a
6 : Compilations/Guardians of the Galaxy, Awesome Mix, Vol. 1/1-07 I Want You Back.m4a
7 : Compilations/Guardians of the Galaxy, Awesome Mix, Vol. 1/1-08 Come and Get Your Love.m4a
8 : Compilations/Guardians of the Galaxy, Awesome Mix, Vol. 1/1-09 Cherry Bomb.m4a
9 : Compilations/Guardians of the Galaxy, Awesome Mix, Vol. 1/1-10 Escape (The Piña Colada Song).m4a
10 : Compilations/Guardians of the Galaxy, Awesome Mix, Vol. 1/1-11 O‐o‐h Child.m4a
11 : Compilations/Guardians of the Galaxy, Awesome Mix, Vol. 1/1-12 Ain’t No Mountain High Enough.m4a
12 : Compilations/Guardians of the Galaxy_ Deluxe [Disc #1 of 2]/1-12 Ain’t No Mountain High Enough.m4a
13 : Compilations/Guardians of the Galaxy, Vol 1_ Awesome Mix, Vol. 1/1-12 Ain’t No Mountain High Enough.m4a
14 : April Wine/The Hits/01 - Say Hello.wav
15 : Nothing Has Changed [Disc 1]/01 Track 1.wav

SQL Whitelist substitutes
---------------------------------------------------

0 : Compilations/Guardians of the Galaxy, Vol. 1_ Awesome Mix, Vol. 1/1-01 Hooked on a Feeling.m4a
1 : Compilations/Guardians of the Galaxy, Vol. 1_ Awesome Mix, Vol. 1/1-02 Go All the Way.m4a
2 : Compilations/Guardians of the Galaxy, Vol. 1_ Awesome Mix, Vol. 1/1-03 Spirit in the Sky.m4a
3 : Compilations/Guardians of the Galaxy, Vol. 1_ Awesome Mix, Vol. 1/1-04 Moonage Daydream.m4a
4 : Compilations/Guardians of the Galaxy, Vol. 1_ Awesome Mix, Vol. 1/1-05 Fooled Around and Fell in Love.m4a
5 : Compilations/Guardians of the Galaxy, Vol. 1_ Awesome Mix, Vol. 1/1-06 I’m Not in Love.m4a
6 : Compilations/Guardians of the Galaxy, Vol. 1_ Awesome Mix, Vol. 1/1-07 I Want You Back.m4a
7 : Compilations/Guardians of the Galaxy, Vol. 1_ Awesome Mix, Vol. 1/1-08 Come and Get Your Love.m4a
8 : Compilations/Guardians of the Galaxy, Vol. 1_ Awesome Mix, Vol. 1/1-09 Cherry Bomb.m4a
9 : Compilations/Guardians of the Galaxy, Vol. 1_ Awesome Mix, Vol. 1/1-10 Escape (The Piña Colada Song).m4a
10 : Compilations/Guardians of the Galaxy, Vol. 1_ Awesome Mix, Vol. 1/1-11 O‐o‐h Child.m4a
11 : Compilations/Guardians of the Galaxy, Vol. 1_ Awesome Mix, Vol. 1/1-12 Ain't No Mountain High Enough.m4a
12 : None
13 : None
14 : April Wine/The Hits/01 Say Hello.wav
15 : None

SQL Whitelist reasons
---------------------------------------------------

0 : ('rename', True, 3961)
1 : ('rename', True, 3962)
2 : ('rename', True, 3963)
3 : ('rename', True, 3964)
4 : ('rename', True, 3965)
5 : ('rename', True, 3966)
6 : ('rename', True, 3967)
7 : ('rename', True, 3968)
8 : ('rename', True, 3969)
9 : ('rename', True, 3970)
10 : ('rename', True, 3971)
11 : ('rename', True, 3972)
12 : ('rename', True, 3973)
13 : ('rename', True, 3973)
14 : ('rename', True, 3844)
15 : ('partial', True, 0)

SQL Table Sizes
---------------------------------------------------------------------------

SQL Location Table 	Page Count:         3 	Size of pages:        3,072
			Row Count:          6 	Last Row Number:          6

SQL Music Table 	Page Count:     4,760 	Size of pages:    4,874,240
			Row Count:      3,972 	Last Row Number:      3,972

SQL History Table 	Page Count:     6,446 	Size of pages:    6,600,704
			Row Count:     29,259 	Last Row Number:     30,901

    History Rows:  |  Type='file'    |  Action='init'    |  count:    3,961
    History Rows:  |  Type='file'    |  Action='edit'    |  count:       80
    History Rows:  |  Type='meta'    |  Action='init'    |  count:    3,825
    History Rows:  |  Type='meta'    |  Action='edit'    |  count:   10,422
    History Rows:  |  Type='scrape'  |  Action='parm'    |  count:      298
    History Rows:  |  Type='lyrics'  |  Action='scrape'  |  count:    1,549
    History Rows:  |  Type='volume'  |  A='detect_old'   |  count:    3,950
    History Rows:  |  Type='volume'  |  A='loudnorm_1'   |  count:      767
    History Rows:  |  Type='volume'  |  A='loudnorm_2'   |  count:      767
    History Rows:  |  Type='volume'  |  A='detect_new'   |  count:      767
    History Rows:  |  Type='rename'  |  Action='Artist'  |  count:        0
    History Rows:  |  Type='rename'  |  Action='Album'   |  count:       16
    History Rows:  |  Type='rename'  |  Action='Title'   |  count:        1
    History Rows:  |  Type='rename'  |  Action='Other'   |  count:       13
    History Rows:  |  Type='delete'  |  Action='Artist'  |  count:        0
    History Rows:  |  Type='delete'  |  Action='Album'   |  count:        0
    History Rows:  |  Type='delete'  |  Action='Title'   |  count:       27
    History Rows:  |  Type='delete'  |  Action='Other'   |  count:        0

Pulse Audio - vu_pulse_audio.py PulseControl()
==========================================================================================

Pulse Audio - sink_input_list (sound sources)
---------------------------------------------------

sink: index=796L, mute=0, name=u'Simple DirectMedia Layer' ffplay
sink: index=798L, mute=0, name=u'Kennedy teams up with Trump. Elensky talks down to Modi. Donbass collapsing, Ukraine stuck in Kursk - YouTube' Firefox

Pulse Audio - sink_list (sound cards)
---------------------------------------------------

sink: description=u'GM204 High Definition Audio Controller Digital Stereo (HDMI)', index=0L, mute=0, name=u'alsa_output.pci-0000_01_00.1.hdmi-stereo', channels=2, volumes=[100% 100%]
sink: description=u'Built-in Audio Analog Stereo', index=1L, mute=1, name=u'alsa_output.pci-0000_00_1f.3.analog-stereo', channels=2, volumes=[100% 100%]

Pulse Audio - source_list (recording)
---------------------------------------------------

sink: description=u'Monitor of GM204 High Definition Audio Controller Digital Stereo (HDMI)', index=0L, mute=0, name=u'alsa_output.pci-0000_01_00.1.hdmi-stereo.monitor', channels=2, volumes=[100% 100%]
sink: description=u'Monitor of Built-in Audio Analog Stereo', index=1L, mute=0, name=u'alsa_output.pci-0000_00_1f.3.analog-stereo.monitor', channels=2, volumes=[100% 100%]
sink: description=u'Built-in Audio Analog Stereo', index=2L, mute=0, name=u'alsa_input.pci-0000_00_1f.3.analog-stereo', channels=2, volumes=[100% 100%]

Pulse Audio - card_list.profile_list
---------------------------------------------------

[<PulseCardProfileInfo at 7f6aeb5d3290 - available=1, description=u'Digital Stereo (HDMI) Output', n_sinks=1L, n_sources=0L, name=u'output:hdmi-stereo', priority=5400L>, <PulseCardProfileInfo at 7f6aeb5d3c50 - available=1, description=u'Digital Surround 5.1 (HDMI) Output', n_sinks=1L, n_sources=0L, name=u'output:hdmi-surround', priority=300L>, <PulseCardProfileInfo at 7f6aeb5d35d0 - available=1, description=u'Off', n_sinks=0L, n_sources=0L, name=u'off', priority=0L>]

Pulse Audio - pulse.server_info().default_sink_name
---------------------------------------------------

alsa_output.pci-0000_00_1f.3.analog-stereo
Loudness Normalization
Five steps are used for fastest performance, best results and granular control:
- Analyze Maximum Volume
- Analyze ‘loudnorm’ Filter
- Analyze ‘loudnorm’ Filter
- Analyze New Maximum Volume
- Create New Volume Playlist
Sample Loudness Normalization
… much, much more to come …
Automatic Skin Color Based on Artwork
This video shows how the skin changes color:
The album artwork is automatically downloaded from the internet when the CD is encoded. You can also choose artwork from any website and use that instead.
The third pixel to the right and third pixel down set the skin tone when you resize the window that could yield a different skin tone!
Automatic Skin Color Notes
- Windows can be resized and Album Artwork grows and shrinks accordingly.
- Primary color (@ coordinates 3x3) can change as artwork is resized.
- Commercial and Intermission buttons are for NHL Stanley Cup Playoffs. Click when commercials start and the TV volume is turned down to 25%. mserve playlist resumes play. When countdown ends the music pauses and TV volume is turned back up to normal volume.
- Shuffle button resorts the selected songs in the playlist.
- Webscraping lyrics is via Genius but some results are “not ideal” so seven other websites out of six have support and a menu to select all six will come soon. SQL will record history of what was scraped when, edited when, how long edit took, time indexed synchronized when, other devices (locations) updated when, which songs were updated, etc.
Hi-Resolution Substitute Artwork
Some albums may have artwork for 2” screens at a resolution of 225x225 pixels or even less. For playing these albums on larger screens, substitute artwork can be dropped into the album folder.
Album artwork extensions can use .jpg, .jpeg or .png formats.
The filename must be ArtworkAlbum.xxx where xxx is a supported
extension.
The album artwork is NOT applied to the song files. The album artwork is merely substituted when a song is played.
Future plans will allow further substitution for a given song rather than all tracks on the album.
Image For Songs with No Artwork
This .gif (no sound) shows how a custom image is used when
a song with no artwork is played:
Show below are the lines you need to change
in the mserve.py Python script:
# When no artwork for song use this image file
ARTWORK_SUBSTITUTE = g.PROGRAM_DIR + "Be Creative 2 cropped.jpg"
# "Be Creative 2 cropped.png" is a 4.4 MB image 3120x3120
Copy your image file to the directory where you installed mserve.
NOTE:
The
.gifvideo was created using:
mmmto get the window coordinates. However, you can usewmctrl -lG
byzanz-record -c --verbose --delay=1 --duration=5 --x=3668 --y=481 --width=1506 --height=737 "No Art 4.gif"Then an on-line
.gifoptimizer reduced the file size from 33 MB to 22 MB using compression level 35 for “Lossy GIF”.
CD Encoding
Great lengths were taken to ensure currently playing song’s animations never lag even when CD’s are being encoded. This video shows how the music player keeps playing without any lag while a CD is being encoded:
Great lengths were also taken to ensure animations never lag even when focus grabbing dialog boxes require a response. If a focus grabbing dialog box is open when current song ends, the next song is played.
The encoding process uses libdiscid to read the Audio CD’s Disc ID. Then Musicbrainz is accessed to get track listings for Disc ID. It accesses Musicbrainz a second time to get the first recorded release date. It then grabs Album Artwork from the internet.
You can paste album artwork from the clipboard which you previously copied from Amazon, or another website.
How-To Encode a CD Overview
After inserting a CD, click the Rip CD button in the Music Location Tree window. The video below shows how to select encoding format, quality, naming format, album date, artwork, genre, comments and track level overrides to genre:
Encode CD Sample Video Highlights
- This video starts after 1 minute is spent reading the CD disc and after 1 minute is spent retrieving Album and Track information from MusicBrainz.com.
- The top pane shows “Selections”. Initially this is only “Tips” because nothing has been selected yet. The “Tips” are also sent to the Information Centre where you can always review later.
- The bottom pane shows information retrieved from MusicBrainz.
- A light blue highlight bar follows the mouse as it travels over rows in the bottom pane.
- The Album Date of “2001” is checked.
- The Medium group is checked. This in turn automatically checks all tracks (songs) within the Medium.
- The second artwork box is checked. This would be the highest resolution of 65k. Behind the scenes, mserve has skipped downloading artwork that is 6k x 2k pixels in dimension and size of 10 MB. You can however copy and paste large artwork from the internet if you choose to. You will be warned whenever artwork exceeds 2 MB though.
- The mouse moves up to select the Format dropdown menu. The last used format of “.mp3” is displayed and it is changed to “.oga”. Notice the tooltip window that appears when the dropdown menu is entered. It automatically fades away after read or instantly fades when you move out of the dropdown menu.
- The mouse moves to the Quality dropdown menu. The last used quality of “70%” is displayed and it is changed to “80%.”
- The mouse moves to the “Naming” dropdown menu. The last use naming of “99 “ is displayed. It is changed to “99 -“. Notice how all the song filenames change in the top pane and bottom pane.
- Scrolling down the top pane you see two artworks are selected; the low resolution and the high resolution. Oops! This means artwork would be alternated between tracks. Track 1 low-res, track 2 high-res, track 3 low-res, track 4 high-res, etc. So the low resolution artwork is deselected.
- Next the Naming format is changed back to “99”.
- The mouse moves down to the very bottom of the window. This is the button bar. The ”? Override” clicked open the Album Level Overrides window.
- The Genre field is set to “Pop”. It is important to always enter a Genre because it is never provided by MusicBrainz.
- An optional Comment is entered.
- The Save button is clicked and the window is closed.
- A message appears advising that Tracks have been changed. Click OK.
- The mouse highlights track number 12.
- Right-click is pressed on track number 12 and the popup menu appears.
- The Edit option is picked from the popup menu.
- The Edit Song Differences window appears. Here you enter details about the song that makes it different from other tracks. Preexisting details come from MusicBrainz plus the Album Level Overrides entered a couple of steps ago. The Genre is changed from “Pop” to “Rock” and the comment is changed.
- Changes are saved and the line is colored green to show that track 3-12 was changed.
- The “Rip CD” button is clicked and the same window for Album Level Overrides appear with a new name: “Encode CD Final Confirmation”.
Album Level Overrides Notes
- The same window can appear twice but the title changes between: “Encode CD Final Confirmation” and *“Album Level Overrides”.
- When Album Level Override variables are entered they filter down to each Track on the Album that previously had the same value.
- A Track that had unique values are not effected.
- The Genre is not provided by MusicBrainz. It should always be entered.
- Verify correct spelling/capitalization of Artist and Album names
- Verify accuracy of the Album Date. It should be the copyright year.
- If a compilation, Artist Name is forced to “Various Artists”,
and the 1st sub-directory is forced to
Compilations. - Gapless Playback has no effect in mserve. It is used by iTunes.
- When overrides are applied, tracks matching the old value are given the new value. If track doesn’t have old value it stays the same.
- After override, tracks can be given a unique Genre, Artist Name, First Date, Composer and Comment.
- Right-click on any track to set uniqueness.
- Once again, the Genre field should always be entered.
Notes About Track Names in Bottom Pane
- Album Level Override set the Genre to “Pop” but this doesn’t appear in Track Names. All tracks were set to “Pop” when override was saved. Because they are the same as the Album Level nothing is displayed.
- The Track Names only show differences from the Album Level. For example, all tracks show the “| artist: NAME” because it is different than the Album Artist which is “Various Artists”
- Track difference on “3-12” the Genre was set to “Rock” and this does appear in Track Names.
- Notice the First Date column there are a few entries for “2001”. You need to research when the song was first released, E.G. “1985” and change the track.
Encoding Metadata Tags
mserve Metadata Tags are displayed with common names. The
common names follow the ffmpeg naming conventions:
| ffmpeg TAG | Description |
|---|---|
| TITLE | Name of the Song |
| ARTIST | Name of band or solo artist |
| ALBUM_ARTIST | Same as ARTIST except for Compilations then “Various Artists” |
| ALBUM | Name of the Album |
| COPYRIGHT | Date the Album (not the song) was released |
| DISC | Disc Number. E.G. single CD is “1/1”. 3 CD set could be “1/3” |
| TRACK_NUMBER | E.G. When 12 tracks, first track “1/12”, last track “12/12” |
| DATE | Song’s first release date in YYYY format. NOT the Album Date! |
| GENRE | E.G. “Rock”, “Soundtrack”, “Country”, etc. |
| CREATION_TIME | Date and time music file created (encoded) |
| COMPOSER | When not specified, defaults to ARTIST |
| COMMENT | One line comment |
| COMPILATION | When value is “1”, folder is /Compilations/ |
| GAPLESS_PLAYBACK | “0” = Off, “1” = On. However, mserve doesn’t support it. |
| ENCODER | E.G. “mserve 3.4.3” or “iTunes 11.4.0.18” |
| DISCID | CDDB Free Disc ID |
| MUSICBRAINZ_DISC | MusicBrainz Disc ID |
Besides these Metadata tags, mserve SQL stores metadata for:
- AlbumDate - The date the album was released
- PlayCount - How many times music file was played > 80% of it’s duration
- LastPlayTime - Date and time song was last played > 80 %
- Rating - Future feature not implemented
- Hyperlink - Future feature
When mserve first discovers a song it takes a “snapshot” of the file’s:
- OsAccessTime - Last access time
- OsModifyTime - Last modification time
- OsChangeTime - Last time permissions were changed
- OsFileSize - Size of file in bytes
When file times are updated by the Operating System, they are NOT
refreshed in mserve SQL database. A side-effect of this is mserve
can reset all files last access time when a program like Rhythm Box reads
every song file and resets last access time to current time. See sql.py
for examples of “fixing” stuff.
Renaming Artists, Albums and Song files After Encoding
Sometimes the on-line databases contain errors. For example, on a three CD Greatest Hits collection, you will find these Album names:
- Greatest Hits Of The 80’s [Disc 2]
- Greatest Hits Of The 80’s Vol. 1
- Greatest Hits of the 80’s
The last CD of the set doesn’t say [Disc 3] nor does it say Volume 3. It gets confusing when you are viewing the Music Location Tree window.
Use this Function to Rename, Not the File Manager
A file manager will not rename Artists, Albums and Song Titles within the mserve SQL database. If you rename with a file manager, original names will still be in the SQL database. So it is important to use this function instead of a file manager.
Call the function within the Music Location Tree window:
- Right click on the third CD Album (Greatest Hits of the 80’s).
- Select “Rename Album” from the popup menu.
- In the dialog box enter “Greatest Hits Of The 80’s [Disc 3]”
- Click the “Apply” button.
- A summary dialog box appears, as shown in the next section.
Rename Album Completion
![mserve rename Greatest Hits Of The 80's [Disc 3].png](/assets/img/mserve/mserve rename Greatest Hits Of The 80's [Disc 3].png)
Usage Notes:
- Cannot change name to blanks.
- Cannot change name to an existing name.
- Songs currently playing cannot be renamed.
- Special characters
/,?,:,<,>,_",_\\,|and*may be changed to an underscore (_) - Pending additions or deletions to playlists must be updated before beginning the rename process.
- The above error and warning messages are sent to the Information Centre for you to review later. Click the thin blue line. Or use the ‘View’ dropdown menu and select ‘Information Centre’.
Special Notes about ID3 Tags:
- The Artist and Album name are only renamed in te Operating System filename and mserve SQL database.
- ID3 tags inside the music file are not touched.
- Use Kid3 or similar program to change Album and/or Artist name inside the music file.
- If Kid3 is installed, it can be called directly from mserve.
- Right click on the music file from the Music Location Tree and select the ‘Kid3’ from the popup menu.
- ID3 tags in the music file are called “Metadata” by mserve.
- mserve will automatically displays Metadata Tags on certain screens when a music file is played.
- mserve can display Metadata Tags on demand from the Music Location Tree when you right click on a music file and select View Raw Metadata or View SQL Metadata from the popup menu.
- mserve can also display Metadata Tags when you open the View dropdown menu and select SQL Music Table. Right-click on a music file and select View SQL Metadata or View Raw Metadata from the popup menu.
Substituting Special Characters in Filenames
When an Artist, Album or Song have these characters in the name:
/,:,?,<,>,",\, or|
The character will be replaced with the _ character instead.
This is necessary to conform to operating system rules for
directory and filenames.
For example, if the names with special characters are:
- Artist:
The Great Band. - Album:
Songs of: 70's/80's - Title:
05 Simple <Little> Thing?.m4a
The file created in Linux will be:
The Great Band_/Songs of_ 70's_80's/05 Simple _Little_ Thing_.m4a
The file created in Windows will be:
The Great Band_\Songs of_ 70's_80's\05 Simple _Little_ Thing_.m4a
Note: In Linux the / character is used to separate directory levels.
In Windows the \ character is used to separate directory levels.
Python Modules Dashboard
This dashboard is autogenerated when the website is refreshed. There are more dashboards in The Cookie Machine ⧉ for global Pippim Website maintenance.
Below are all the Python Modules in mserve. Note: Turn your mobile phone sideways (Landscape Mode) to see all columns.
Python Modules used in Pippim mserve Version 3.5.0
| Python Module | Lines | Modified | Description |
|---|---|---|---|
calc.py |
264 | 2025-02-10 10:11:47 | Calculator for big numbers |
disc_get.py |
48 | 2025-06-01 11:49:44 | Get discid of CD |
encoding.py |
4,226 | 2025-08-03 17:53:45 | Encode (Rip) CD to music files |
external.py |
630 | 2025-06-14 17:23:57 | Calls to External Programs |
global_variables.py |
255 | 2025-02-08 08:20:41 | Global variables shared by all modules |
image.py |
2,236 | 2026-05-12 20:05:25 | Image Processing |
location.py |
7,112 | 2025-12-25 15:42:34 | Locations of Music Dirs & Devices |
m |
91 | 2025-06-08 10:18:36 | m - Wrapper for mserve Fast Startup |
mbz_get1.py |
456 | 2025-06-01 11:00:46 | Get musicbrainzngs ‘release-list’ |
mbz_get2.py |
150 | 2025-06-01 11:01:14 | Get musicbrainzngs artwork |
message.py |
2,065 | 2026-05-19 18:52:39 | Message Dialog Boxes |
monitor.py |
1,736 | 2025-07-08 17:59:51 | Multiple Monitor Management |
mserve.py |
23,612 | 2026-03-04 08:12:13 | Main mserve Python Module |
mserve_config.py |
1,330 | 2024-09-15 08:27:15 | Dependencies Checker and Setup |
sql.py |
5,551 | 2026-01-25 09:43:06 | SQLite3 Interface |
timefmt.py |
266 | 2025-07-06 16:45:10 | Date & Time formatting |
toolkit.py |
6,951 | 2026-05-31 18:52:41 | Tkinter Tools and Tooltips() |
vu_meter.py |
214 | 2025-06-22 13:48:10 | VU Meter processor spawned by mserve.py |
vu_pulse_audio.py |
1,116 | 2026-06-04 17:54:07 | Pulse Audio Volume Controls |
webscrape.py |
1,487 | 2024-09-12 05:27:45 | Webscrape Lyrics from genius.com |
x11.py |
313 | 2023-12-31 09:25:08 | X11 window client |
| ALL Modules | 60,109 |
Table was updated June 8, 2026.
The table is autogenerated when
refresh.sh ⧉ 🔗
calls
mserve_config.py ⧉ 🔗
which writes output to
~/website/programs/mserve_incl.md ⧉ 🔗
There are also some Bash scripts:
mserve_client.sh⧉ 🔗 334 lines - SSH Host Keep Awake (prevent sleeping/suspend)test-for-sync.sh⧉ 🔗 21 lines - Create testdata for synchronizing locations
Dependencies
Below are the dependencies documented in mserve.py python program.
You may already have them installed. The list is for Ubuntu 16.04 LTS
using Python version 2.7.12. For Python 3+ versions, substitute python3
below where it says python:
sudo apt install compiz                  # for Hockey (smooth shark move)
sudo apt install dconf-editor            # for Hockey (gsettings)
sudo apt install ffmpeg                  # for artwork, ffprobe and ffplay
sudo apt install gstreamer1.0-tools      # For encoding CDs gst-launch-1.0
sudo apt install kid3                    # Optional for editing metadata
sudo apt install pauvcontrol             # For VU Meters (sound redirect)
sudo apt install pqiv                    # Make transparent Shark (Hockey)
sudo apt install python-appdirs          # Application directory names
sudo apt install python-beautifulsoup    # Scrape Song lyrics
sudo apt install python-gi               # Gnome window functions (newer)
sudo apt install gir1.2-wnck-3.0         # Gnome window functions (older?)
# NOTE: python-wnck not tested but may work instead of gi + gir1.2-wnck-3.0
sudo apt install python-libdiscid        # Get CD's disc ID
sudo apt install python-notify2          # Popup bubble messages
sudo apt install python-numpy            # Installed by default in Ubuntu
sudo apt install python-magic            # Get file type "magic" information
sudo apt install python-musicbrainzngs   # Get metadata for CD
sudo apt install python-mutagen          # Encode and ID3 tags
sudo apt install python-pil              # PIL graphics routines
sudo apt install python-pil.imagetk      # PIL image processing
sudo apt install python-pyaudio          # For background job vu_meter.py
sudo apt install python-requests         # Get Cover Art
sudo apt install python-selenium         # Automated YouTube Playlist play
sudo apt install python-subprocess32     # To compare locations
sudo apt install python-simplejson       # automatically installed Ubuntu
sudo apt install python-tk               # Tkinter (default in Windows & Mac)
sudo apt install wmctrl                  # To move Kid3 or Fishing window
sudo apt install x11-apps                # xwd window dump (screen shot)
sudo apt install xclip                   # Insert clipboard
sudo apt install xdotool                 # To move Kid3 or Fishing window
Additionally, there are external repositories (PPA) that need to be installed.
ffmpeg & ffprobe
============================================================================
The versions released with Ubuntu can be 8 years old. For example, In the
year 2024, Ubuntu 16.04 LTS ESM has ffmpeg version 2.8.17 from 2016. As of
April 2024, stable 6.1 versions of ffmpeg and ffprobe can be found at:

   https://ffmpeg.org/download.html

ffmpeg version 3.1 is minimum version for "loudnorm" filter processing. The
"loudnorm" filter is used to normalize maximum volume levels to 0 dB. You
can install ffmpeg and ffprobe to ~/bin and keep original versions in
/usr/bin.


External Repositories
============================================================================
sudo add-apt-repository ppa:j-4321-i/ttkwidgets  # CheckboxTreeview
# This is necessary for ttkwidgets and ttkcaldenar
sudo apt-get update
sudo apt-get install python-ttkwidgets           # CheckboxTreeview
sudo add-apt-repository ppa:j-4321-i/ppa
sudo apt-get update
sudo apt-get install python-tkcalendar
Finally, there are programs that have no sudo apt install capability
such as pulsectl
that require git pull command followed by cp command.
As of June 8, 2026, dependencies have to be manually installed. A long term plan is to create an installation script that installs all dependencies automatically. In the short term, development has begun to identify installed versions.
SQL Views
mserve uses proprietary data dictionary technology to quickly
view rows in the three SQL tables:
- Music Table contains OS song file information, metadata, song lyrics, lyric time indices, play counts and the like.
- History Table contains records of actions taken such as; initial metadata encounters, webscraping lyrics and encoding CDs.
- Location Table defines the various music locations on your local device, external storage, remote hosts and mobile phones. the filenames you will need to backup. A brief explanation is given for how each file is used.
SQL Location Table Data Dictionary Driven Viewer
The SQL Location Table defines the various music locations on your local device, external storage, remote hosts and mobile phones.
mserve uses proprietary data dictionary technology to quickly view rows in the SQL Location Table. Use the View dropdown menu from the Music Location Tree (main) window of mserve. A sample video appears below.
SQL Location Table Viewer Sample Video
SQL Table Viewer Sample Video Highlights
- The options for File, Edit and View dropdown menu are shown
- The mouse hovers over button bar at bottom of window
- Tooltips for buttons appear after a short delay
- Tooltips gradually fade in, remain a short period, then gradually fade out
- The Help button is clicked and results appear
SQL Tables
The popular SQL database engine sqlite3 which is used by your
web browser is also used by mserve.
Here are the SQL Tables and Indices that are created in the sqlite3 file ~/…/mserve/library.db:
def open_db(LCS=None):
    """ Open SQL Tables - Music Table and History Table
        Create Tables and Indices that don't exist
    :param LCS: instance of Location() class for lcs.open_code, etc.
    """

    #open_new_db()  # Database 'library_new.db' only used for conversions.

    global con, cursor, hist_cursor, loc_cursor, lcs
    if LCS:
        lcs = LCS  # Locations class

    con = sqlite3.connect(FNAME_LIBRARY)

    # MUSIC TABLE
    con.execute(
        "create table IF NOT EXISTS Music(Id INTEGER PRIMARY KEY, " +
        "OsFileName TEXT, OsAccessTime FLOAT, OsModifyTime FLOAT, " +
        "OsChangeTime FLOAT, OsFileSize INT, " +
        "ffMajor TEXT, ffMinor TEXT, ffCompatible TEXT, " +
        "Title TEXT, Artist TEXT, Album TEXT, Compilation TEXT, " +
        "AlbumArtist TEXT, AlbumDate TEXT, FirstDate TEXT, " +
        "CreationTime TEXT, DiscNumber TEXT, TrackNumber TEXT, " +
        "Rating TEXT, Genre TEXT, Composer TEXT, Comment TEXT, " +
        "Hyperlink TEXT, Duration TEXT, Seconds FLOAT, " +
        "GaplessPlayback TEXT, PlayCount INT, LastPlayTime FLOAT, " +
        "LyricsScore BLOB, LyricsTimeIndex TEXT)")

    con.execute("CREATE UNIQUE INDEX IF NOT EXISTS OsFileNameIndex ON " +
                "Music(OsFileName)")

    # HISTORY TABLE
    con.execute(
        "create table IF NOT EXISTS History(Id INTEGER PRIMARY KEY, " +
        "Time FLOAT, MusicId INTEGER, User TEXT, Type TEXT, " +
        "Action TEXT, SourceMaster TEXT, SourceDetail TEXT, " +
        "Target TEXT, Size INT, Count INT, Seconds FLOAT, " +
        "Comments TEXT, Timestamp FLOAT)")

    con.execute("CREATE INDEX IF NOT EXISTS MusicIdIndex ON " +
                "History(MusicId)")
    con.execute("CREATE UNIQUE INDEX IF NOT EXISTS TimeIndex ON " +
                "History(Timestamp)")
    con.execute("CREATE INDEX IF NOT EXISTS TypeActionIndex ON " +
                "History(Type, Action)")

    # LOCATION TABLE
    con.execute(
        "CREATE TABLE IF NOT EXISTS Location(Id INTEGER PRIMARY KEY, " +
        "Code TEXT, Name TEXT, ModifyTime FLOAT, ImagePath TEXT, " +
        "MountPoint TEXT, TopDir TEXT, HostName TEXT, " +
        "HostWakeupCmd TEXT, HostTestCmd TEXT, HostTestRepeat INT, " +
        "HostMountCmd TEXT, HostTouchCmd TEXT, HostTouchMinutes INT, " +
        "Comments TEXT)")
    con.execute("CREATE UNIQUE INDEX IF NOT EXISTS LocationCodeIndex ON " +
                "Location(Code)")


    ''' For mserve.py rename_file() function to rename "the" to "The" '''
    con.execute("PRAGMA case_sensitive_like = ON;")

    con.row_factory = sqlite3.Row
    cursor = con.cursor()
    hist_cursor = con.cursor()
    loc_cursor = con.cursor()
Pickled Data Files
The pickle data file format allows serialized Python objects such as variables, lists and dictionaries to be stored in non-serialized format on storage devices.
NOTE: As of December 15, 2024, most pickle data files have been abandoned and SQL is used instead.
An abbreviation system is used for the filenames below:
~/represents your home directory..../represents the subdirectory, under your home directory, where your application data files are stored.
For Windows:
C:\Documents and Settings\<User>\Application Data\Local Settings\pippim\mserveC:\Documents and Settings\<User>\Application Data\pippim\mserve
For MacOS:
/Users/<User>/Library/Application Support/mserve
For Linux, ChromeOS, Windows Subsystem for Linux:
/home/<User>/.local/share/mserve
Here are the data files (stored in pickle format) created in
the ~/.../mserve directory:
- last_location - lc.FNAME_LAST_LOCATION - The last location ID used. E.G. “L001”, “L002”, etc. August 5, 2023 Note: This will soon be replaced by SQL History Table row Type=’location’, Action=’last’. December 15, 2024 Note: This file is no longer used.
- locations - lc.FNAME_LOCATIONS - All available locations and their control settings. August 5, 2023 Note: This will soon be replaced by SQL Location Table. December 15, 2024 Note: This file is no longer used.
- library.db - lc.FNAME_LIBRARY - This is not in pickle format. It is an sqlite3 database with Music Table and History Table.
One subdirectory is created for every location. E.G. the subdirectory
~/.../mserve/L004 contains:
- last_open_states - lc.FNAME_LAST_OPN_STATES - Each Artist and Album and whether or not they are open (down triangle / chevron) or closed (left pointing triangle / chevron) in the Music Location Tree window.
- last_playlist - lc.FNAME_LAST_PLAYLIST - Full path names of all songs checked (have the blue square) in the Music Location Tree window. Sorted in playlist order. December 15, 2024 Note: This file is no longer used.
- last_song_ndx - lc.FNAME_LAST_SONG_NDX - Zero based index into
last_playlist indicating the song that was playing when mserve
was shutdown. August 5, 2023 Note: This is superseded by
SQL History Table Row Type=’resume’, Action=
. - modification_time - lc.FNAME_MOD_TIME - Cell phones may not allow changes to music files’ last modification time. mserve uses this file as a shadow filesystem to track last modification time. Used by the Synchronize Location function.
- size_dict - Size dictionary for Smartphones. Same purpose as above.
- walk_list - Directory tree for Smartphones. Same purpose as above.
Within mserve Python scripts, lc.FNAME represents:
- “location.py” (lc.)
- “Filename” (FNAME).
Note: When working inside the location.py module,
drop the lc. prefix.
In the other Python modules, import location as lc is used.
Pickled YouTube Playlists
The directory ~/.../mserve/YouTubePlaylists/ contains:
-
<PLAYLIST NAME>.pickle- This file is generated the first time a YouTube Playlist is opened. It takes about 1 second per song to capture images. The next time the playlist is opened this file is reused for instant display. -
<PLAYLIST NAME>.csv- This file contains YouTube Playlists that are automatically generated by mserve. There are three Copy functions and a Move script described in the next four subsections. These functions / script allow you to manually accomplish, for other Music Players, what mserve does automatically
Generating YouTube Playlists requires some manual steps:
Copy 1
Before copy 1, open playlist in browser and press Ctrl + i . This will open the Console in the Chrome and Firefox web browsers.
let goToBottom = setInterval(() => window.scrollBy(0, 400), 1000)
Copy 1:
- Hover mouse over code above.
- Click the Copy button that appears to copy to clipboard.
- Click on web browser console prompt and use Ctrl + v to paste.
- If you are using Firefox and have never pasted before you must enter “allow pasting” (without the quotes) one-time only.
- Press Enter to run the pasted code.
- Wait for all songs to scroll by and then proceed to next step
Note: You may have to adjust window height and/or console divider to split window between regular browser view and console view.
Copy 2
 clearInterval(goToBottom)
 console.log('\n'.repeat(50))

 let arrayVideos = []
 const links = document.querySelectorAll('a')
 for (const link of links) {
     if (link.id === "video-title") {
         link.href = link.href.split('&list=')[0]
         arrayVideos.push(link.title + ';' + link.href)
     }
 }

 let arrayTime = []
 const spans = document.querySelectorAll('span')
 for (const span of spans) {
     if (span.id === "text" &&
     span.classList.contains('ytd-thumbnail-overlay-time-status-renderer'))
     {
         arrayTime.push(span.innerText.replace(/[^\d:]/g, ''))
     }
 }

 if (arrayVideos.length === arrayTime.length) {
     for (var i=0; i<arrayVideos.length; i++) {
         arrayVideos[i] = arrayVideos[i] + ';' + arrayTime[i]
         console.log(arrayVideos[i])
     }
 }
Copy 2:
- Hover mouse over code above.
- Click the Copy button that appears to copy to clipboard.
- Click on web browser console prompt and use Ctrl + v to paste.
- Press Enter to run the pasted code.
Copy 3
 let data = arrayVideos.join('\n')
 let blob = new Blob([data], {type: 'text/csv'})
 let elem = window.document.createElement('a')
 elem.href = window.URL.createObjectURL(blob)
 elem.download = 'my_data.csv'
 document.body.appendChild(elem)
 elem.click()
 document.body.removeChild(elem)
Copy 3:
- Hover mouse over code above.
- Click the Copy button that appears to copy to clipboard.
- Click on web browser console prompt and use Ctrl + v to paste.
- Press Enter to run the pasted code.
- A prompt appears asking to Open or Save the CSV file. Choose the Save option and click OK .
- The next two steps can be skipped, if you run the
youPlaylistMoveCSV.shscript provided in the next section. - Open your “Downloads” folder and rename the file
my_data.csvto<PLAYLIST NAME>.csvwhere ** is the name of the playlist. - Move the renamed file
<PLAYLIST NAME>.csvto the mserve data directory~/.local/share/mserve/YouTubePlaylists. If the directory doesn’t exist you will have to create it first. - Open mserve, Music Location Tree, View Dropdown Menu, View Playlists and select the YouTube Playlist you setup earlier.
- Click the View button and the playlist will be generated.
- Close the web browser window. You will need to open a new YouTube playlist in order to paste copied code again.
Move CSV File
Put the following bash / shell commands into a script you can call.
The sample file youPlaylistMoveCSV.sh can be copied and renamed.
#!/bin/bash
#  https://www.pippim.com/programs/mserve.html#pickled-youtube-playlists

#    Follow instructions and note "Copy Button" below:

#        STEP 1: Use CTRL+I in web browser
#        STEP 2: Click Button 1 to copy to clipboard "youPlayListScroll()"
#        STEP 3: Go to web browser and use CTRL+V then Enter
#        STEP 3A: Type "allow pasting" (without the quotes) if requested by browser
#        STEP 3B: Wait for web browser to stop scrolling, 1 second per song
#        STEP 4: Click Button 2 to copy to clipboard "youPlaylistCopy()"
#        STEP 5: Go to web browser and use Ctrl+V then Enter
#        STEP 6: Click Button 3 to copy to clipboard "youPlaylistSave()"
#        STEP 7: Go to web browser and use Ctrl+V then Enter
#        STEP 8: Run this bash script youPlaylistMoveCSV.sh
#        STEP 9: Use "View Playlists", select Playlist, View Button

if [ "$#" -ne 1 ]; then
    printf 'ERROR! You must provide the "Playlist Name" in quotes!\n' >&2
    exit 1
fi

if [ ! -f ~/Downloads/my_data.csv ]; then
    printf "ERROR! File ~/Downloads/my_data.csv not found!\n" >&2
    exit 1
fi

cd ~/Downloads
mv -v my_data.csv "$1".csv
cp -v "$1".csv ~/.local/share/mserve/YouTubePlaylists
rm -v ~/.local/share/mserve/YouTubePlaylists/"$1".pickle
Move CSV file:
- Call the script using
youPlaylistMoveCSV.sh "<PLAYLIST NAME>". - It is important to include the double quotes around the playlist name.
- Do NOT add
.csvafter the"<PLAYLIST NAME>"because, the script automatically adds it. - You should already have the playlist defined with the name
field containing:
<PLAYLIST NAME>and the description field containing:<PLAYLIST URL LINK>. - After moving the CSV file, start mserve, if it isn’t already running.
- If the playlist hasn’t been defined in mserve yet, first use the New Playlist option under the File Dropdown Menu in the Music Location Tree window. Then proceed to the next step.
- In the Music Location Tree window, select the View Dropdown Menu.
- Select the View Playlists option.
- Highlight the appropriate playlist and click View button or double-click it.
Processing Playlists Methods
JSON Data Files
Just like pickle data files, the JSON format allows serialized Python objects like lists and dictionaries to be stored in non-serialized format on storage devices.
Unlike the pickle format, the JSON format is human-readable.
You will find JSON data files whenever a location resides on an FTP Host Server like an Android mobile phone.
These are the files you will find in the location subdirectory:
- walk_list - lc.FNAME_WALK_LIST - Cached directory and filenames that dramatically speeds up mserve startup time from many minutes to a split second.
- size_dict - lc.FNAME_SIZE_DICT - Filename dictionary with file sizes dramatically speeds up generating the Music Location Tree.
Windows Open Where You Want Them
Most applications always open their windows at the same locations.
Then you have to move the windows to where you want them. mserve
remembers where you like your windows to be and moves them there.
Besides the dozen or so windows that mserve uses, it also remembers if you use Hockey TV commercial buttons or FF & Rewind buttons instead. It also remembers if you prefer the Chronology (playlist) hidden or shown and the exact second of the last song you were listening to, or even if it was paused.
This is how mserve remembers and restores window positions and sizes:
def save_window_geom(name, geom):
    """
    CURRENT:
        Get geometry for window which was saved on last exit. If no record
        use 100,100 and predefined default width & height. Returns string
        of "width x height + x + y" with no spaces in between variables.
    """

    if sql.hist_check(0, 'window', name):
        sql.hist_cursor.execute("SELECT * FROM History WHERE Id = ?",
                                [sql.HISTORY_ID])
        d = dict(sql.hist_cursor.fetchone())
        if d is None:
            print('monitor.save_window_geom error no History ID:', HISTORY_ID)
            return False
    else:
        # First time add the record
        # sql.hist_add(time.time(), 0, lc.USER, 'window', name, geom,
        sql.hist_add(time.time(), 0, g.USER, 'window', name, geom,
                     'saved on exit, loaded on starting', None, 0, 0, 0.0,
                     "Used in conjunction with 'screen' History Record Id #")
        sql.con.commit()
        return True

    ''' We have the existing history record, simply replace the geometry field '''
    sql_cmd = "UPDATE History SET Time=?, SourceMaster=? WHERE Id = ?"

    sql.cursor.execute(sql_cmd, (time.time(), geom, sql.HISTORY_ID))
    sql.con.commit()
Tooltips Gradually Fade In and Out
A lot of work has gone into crafting the tooltips to delay before gradually fading in. Also, to gradually fade out. And finally, the Tooltip message bubble follows the moving mouse pointer.
Key features of tooltips:
- When mouse hovers over a button, tooltips appear after a delay
- Tooltips gradually fade in
- They stay visible for a short time based on word count
- Tooltips follow mouse mouse movements inside button
- Clicking button or moving mouse out of button forces fade out
- Tooltips gradually fade out
Lyrics Synchronization
After song lyrics have been trained (Time Index assigned to each lyrics line) each line is highlighted as it is sung. Before training, lyrics are auto-scroll based on preset algorithm. Manual scrolling can be turn on to override Auto and Time scrolling.
A sample video is shown below. It shows how the toggle button works between automatic lyrics scrolling and manual scrolling:
Notes:
- When video starts with song in orange the default is “Auto Scrolling”
- Click button to engage “Manual Scroll”
- Now scroll bar appears on right, and you can scroll lyrics
- The vido changes to next song in black and the default is “Time Scrolling”
- Click the button to engage “Manual Scroll”
- Click the button again to reengage “Time Scrolling”
- Now each lyrics line is automatically highlighted as it is sung
- For Time Scrolling to work you need to train mserve with the timing.
Synchronized Lyrics in Action
This video shows how artwork, automatically obtained from the internet, is animated on your screen:
- It rotates clockwise
- At 90 degrees it slides right then resumes rotating
- At 180 degrees it slides down then resumes rotating
- At 270 degrees it slides left then resumes rotating
- At 360 degrees it slides up, pixelates, then the process repeats
IMPORTANT: Un-mute video to hear song
This video also shows:
- Two real-time VU meters for left and right channels
- Tooltips for buttons. This is an OLD video: The new tooltips fade in and out after delays and follow mouse cursor. See sections below for examples.
- Lyrics are highlighted in time with the music
- Lyrics are automatically retrieved from the internet (from eight different sites)
- You can manually change the lyrics retrieved
Additional notes:
- Edit lyrics for minor changes or massive copy from internet and replace.
- Click on each line to synchronize the time for future playback.
- Auto scroll lyrics, time scroll lyrics or manually scroll lyrics score.
- Fine-tune adjustments to time index are done on separate window.
- Sample middle 10 seconds of song. Future select one or two key song lines.
- Right click on song to bring up Kid3 which runs on Linux, Windows and Mac.
- Multiple locations are supported including sleeping servers woken with magic packet.
- Compare music files between locations and update differences.
- Compare supports Android with shadow file system for last modified date.
- Encode CDs with automatic track name retrieval from MusicBrainz.
- Encode CDs with automatic Cover Art download or Image paste from clipboard.
- SQLite3 now used to replace old pickles and to add new features for history tracking.
- Music player runs while encoding process takes dozens of minutes per CD.
Basic Time Synchronization
The ☰ (Hamburger) Dropdown Menu is shown below:
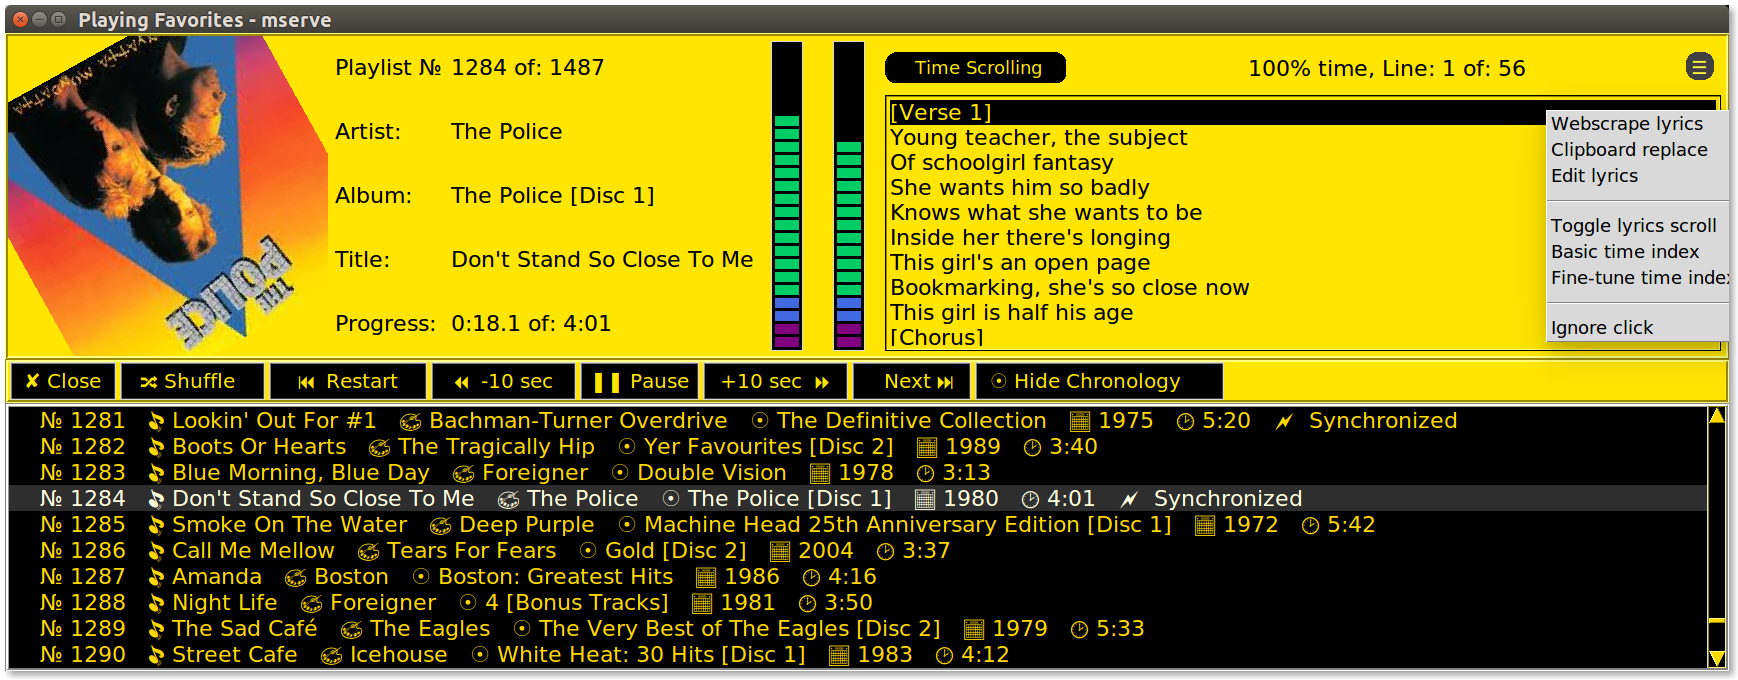
The same Dropdown menu appears when you right-click on the lyrics score (the song’s lyrics).
A sample video is shown below. It shows how the Basic Time Index feature works. Simply click to highlight and synchronize each lyrics line as it is being sung:
Basic Time Synchronization Sample Video
Basic Time Synchronization Sample Video Highlights
- The
☰(Hamburger) Dropdown Menu where the Basic time index option is picked. - Canceling the Basic time index option once started.
- Restarting the Basic time index from the
☰menu. - Clicking each line as it is sung.
- The time indices are automatically saved when the song ends,
or you can choose the “Save index” option from the
☰menu if, you don’t want to wait for the song to end.
Fine-Tune Time Index
Sometimes you just can’t seem to click at the right time using Basic Time Index in the previous section. For those cases the Fine-Tune Time Index window is provided.
Begin Sync option
In the following video notice how the option is included in
the ☰ (Hamburger) menu and is selected. The video delays long
enough so that you can see all the menu options.
This video shows:
- The Lyrics
☰(Hamburger) Dropdown Menu options - The “Ignore click” option on the menu. This closes the menu which is the same as moving the mouse off the menu and clicking outside the menu.
- Access the hamburger menu again and select the “Fine-tune time index” option
- The Fine-tune time-index window opens up and pauses the regular music player
- Select lyric lines in the lyrics score
- Begin sync button. As music plays you can click the line as it is sung
- Clicking each line as it is sung is the same behavior as the Basic time index function except that additional details are displayed
- Finally, the Fine-tune time index window is closed and regular music player resumes where it was interrupted
80% of lines must be basic synchronized
This screen appears when you have not completed basic time synchronization for at least 80% of the lines:
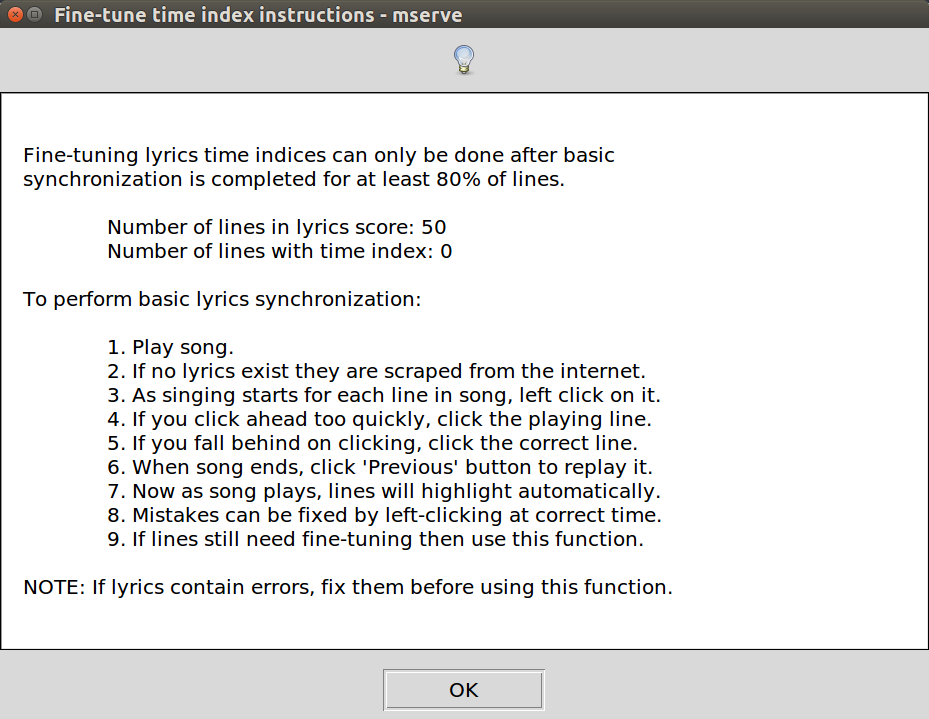
Fine-Tune Time Index cannot be done until 80% of lines have Basic Time Index completed.
Sample All option
The following video also shows how the Fine-tune time index function is selected. This time the video spends a little time showing you all the buttons in the function.
After turning on sound for the video below and clicking play, make sure you move your mouse outside the video. This way you can see the entire contents underneath your browser’s video control bar.
Video Highlights:
- The “Paused” graphic in the regular music player. It is programmatically generated and not an image file that can be changed.
- The regular music is resumed and the
☰menu is used to select the Fine-tune time index option - The Sample all button is selected
- The function plays the first second of each line
- We noticed at time index
154seconds the instrumental section was left on too long. This caused the Chorus line and next line to start too late. - Those three lines were selected and Begin sync button is used to fine-tune the timing
- When fixing the timing though we clicked too soon rather than
too late as before. So we click back on a previous line and take a “mulligan”. Then we click again as the music catches up. - Next, the time indices are saved by clicking the Save button
- Finally, the function is closed by clicking the Close button and the regular music player resumes play automatically.
Hide/Show Chronology
The Chronology Song List shows:
- The previous three songs played
- The current song being played, highlighted in green
- The next six songs coming up in the playlist
You can hide the Chronology Song List. This expands the art work and shifts the Lyrics Score beneath the Metadata and VU Meters. The sample video belows shows mserve playing Favorites playlist and the Hide Chronology button being clicked.
Hide Chronology List Sample Video
Hide Chronology List Sample Video Highlights
- The cursor moves over the artwork
- The artwork is clicked to resume playing the music
- The mouse hovers over the volume slider
- The volume is slide lower and the VU meters lower in strength
- The mouse hovers over the metadata
- Metadata changes depending on each song and amount of information
- 14 is the maximum number of metadata display lines
- Metadata display for more than 14 lines is selected on a priority system
- The mouse pointer moves over the scrolling lyrics
- Notice the lyrics are highlighted as each line is sung
- The mouse moves down to the Hide Chronology button
- After the tooltip slowly fades in, the button is clicked
- Notice the Hide Chronology button text changes to Show Chronology
- The Artwork size doubles and occupies some of the space where the chronology used to be
- The Lyrics score moves from the right side, down below the metadata and occupies the rest of the space where the chronology used to be
- Lyrics score lines are now wider to reduce line wrapping
- More space is available for wider metadata display (future upgrade)
- The volume slider is wider and VU meters are shorter
Note: The software used to create this video, made volume changes jump when volume slider was moved. Volume changes are “as smooth as silk”, when using mserve in real life.
Chronology List Popup Menu
Right-click on any song in the Chronology Song List to:
- Play that song
- Filter chronology list by synchronized songs only
- Filter chronology list by unsynchronized songs only
- Filter chronology list for the same artist
- Filter chronology list for songs longer than five minutes
- Open that song in Kid3 (Metadata Tag Editor)
- Open that song in the File Manager (AKA Nautilus)
Chronology List Popup Menu Filter Options for Loudness Normalization
When a Loudness Normalization Playlist is active, the filter options change to:
- Filter volume worse (new volume is worse than old volume)
- Filter volume missed target (mew volume over 0.1 dB from target)
- Filter volume met target (new volume is within 0.1 dB of target)
You can redo volume normalization using the Music Location window’s Dropdown menu and selecting: ‘Tools’, ‘Volume’, ‘Analyze New Volume’, ‘Right Click’, ‘Redo normalization’. You do not need to run the ‘Create Normalization Playlist’ after redoing the normalization.
Locations
When you start mserve, or open and play a different location, music resumes playing where it left off. If music was paused, it is paused at the the same song position when mserve ended.
Locations are the heart of controlling mserve. Locations keep track of where music is stored.
In addition to tracking music on local storage, Locations can access music stored on a File Server or a Mobile Phone.
Sample View Locations Window
Here is a sample View Locations window with the selected location highlighted in green.
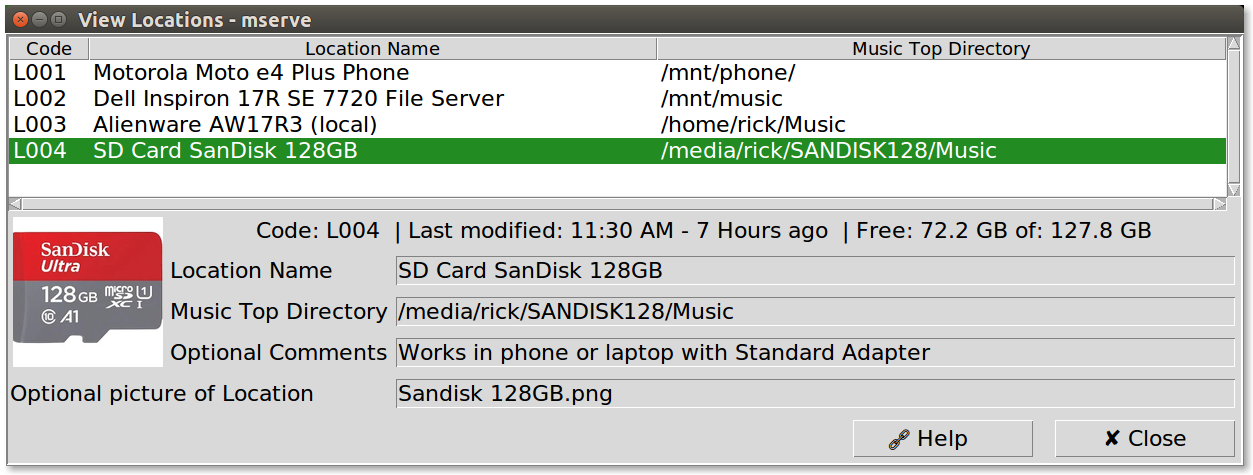
Mandatory Location Fields. The first two fields are mandatory:
- Location Name - Cannot be blank and must be unique
- Music Top Directory - The parent folder / subdirectory that contains Artist subdirectories. The Top Directory cannot be changed for the currently opened location. To change the current location’s Top Directory, Open and play a different location with the File dropdown menu in the Music Location Tree window. That is the main window when mserve starts.
The above sample screen was generated when optional host commands
are not installed. 20,000 lines deep inside mserve, are these
python tests:
self.nmap_installed = ext.check_command('nmap')
if self.nmap_installed:
   ''' Command 'nc' also required to quickly check if host is up '''
   self.nmap_installed = ext.check_command('nc')
self.ssh_installed = ext.check_command('ssh')
self.sshfs_installed = ext.check_command('sshfs')
if self.sshfs_installed:
   self.sshfs_installed = ext.check_command('fusermount')
self.wakeonlan_installed = ext.check_command('wakeonlan')
Sample Edit Location Window
Here is a sample Edit Location window with the selected location highlighted in green. This location is a “Sleeping Host”.
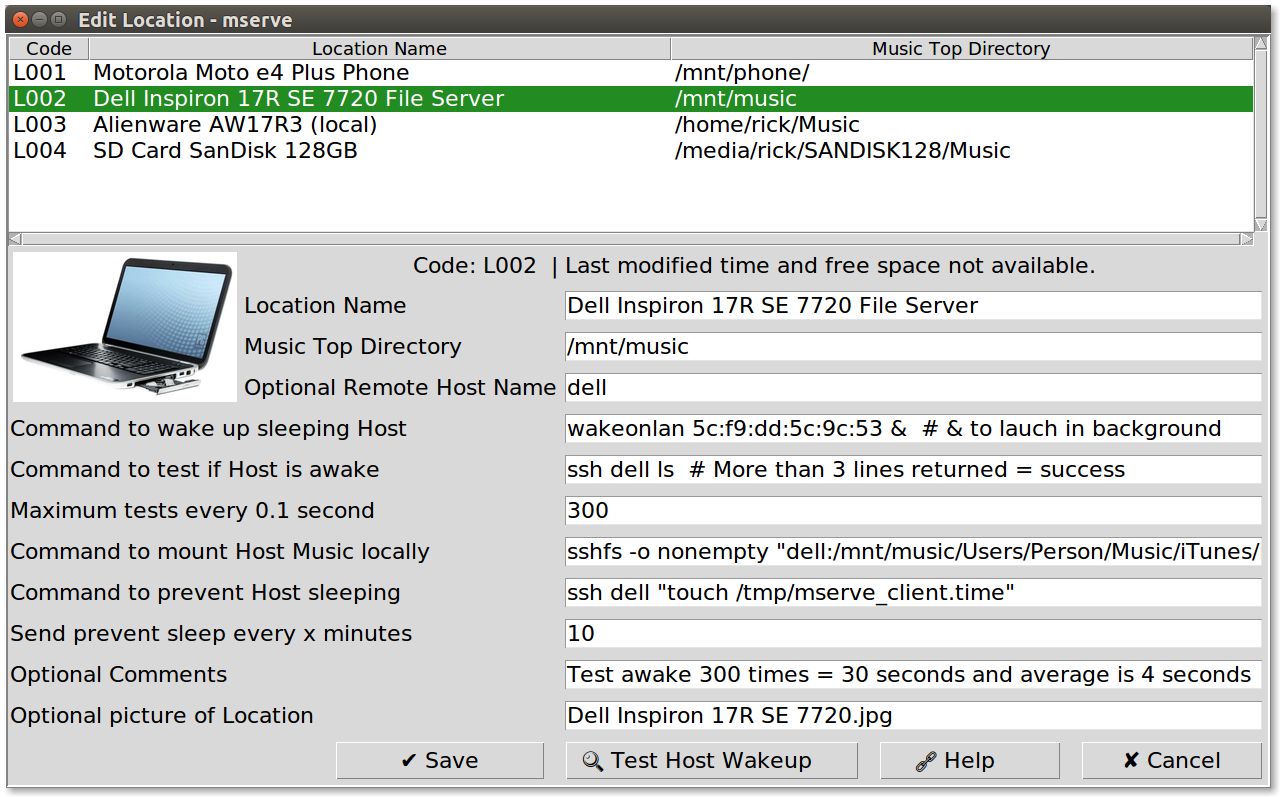
Mandatory Location Fields. The first two fields are mandatory:
- Location Name - Cannot be blank and must be unique
- Music Top Directory - The parent folder / subdirectory that contains
Artist subdirectories. The music top directory is validated to contain
Artist/Album/Song File subdirectory structure with at least 10 song files.
The remaining fields, starting at Optional Remote Host Name, are optional.
Optional Location Fields:
- Optional Remote Host Name - If the Music Top Directory is on
a remote host, enter that name here. This is the only field that
must be entered for a remote host. The remaining fields are optional for
a remote host. This field does not appear unless
nmapandncare installed. - Command to wake up sleeping Host - If the host is normally
asleep (to save electricity and extend life), enter the
waekonlancommand here. Make sure&is appended to launch command in the background. This is important for mserve to test when host is awake and move onto the next test step. This field does not appear unlessnmap,ncandwakeonlanare installed. - Command to test if Host is awake - Only enter a command if the
previous field to wake Host was used. mserve tests if more than
three lines were returned by this command to know host is awake. This
field does not appear unlessnmap,ncandsshare installed. - Maximum tests every 0.1 second - Only enter a command if the previous field to test if Host is awake was used. mserve runs the previous field test this number of times. In the example 300 times is used which is 30 seconds.
- Command to mount Host Music locally - If the Host’s music isn’t
automatically mounted, enter the mount command here. Note in this example
the
nonemptyparameter is used. This is helpful if mserve was restarted and the previous mount was still left mounted. This field does not appear unlessnmap,ncandsshfsare installed. - Command to prevent Host sleeping - If Host had to be woken up,
enter a command to keep it awake. Assuming you are using the
mserve_client.shscript on the host, the command would be:ssh <HOST> "touch /tmp/mserve_client.timewhere<HOST>is the remote Host’s name. This field does not appear unlessnmap,ncandsshare installed. - Send prevent sleep every x minutes - Only enter this field if
the previous field was entered. In the screenshot
10is entered such that every ten minutes the previous field’s command is issued. When you exit mserve the host will fall asleep on it’s own. If you suspend your laptop, the host will still fall asleep and when you wake up your laptop, the host will be unavailable and mserve will advise you it needs to be woken up again. In this case, mserve is forced to run the “Open Location and Play” function which is essentially a restart. - Optional Comments - Have no effect on mserve operation. Indeed in this case the comment is incorrect and says “10 seconds” instead of “100 seconds”.
- Optional picture of Location - Upload a picture to the subdirectory
where
mserve.pyis installed. Then use the filename picker to select that filename. An image of what the location looks like is helpful because sometimes nested directory names don’t jog your memory.
If the File Server spends most of its life sleeping, mserve can wake it
up with a “Magic Packet” over wired Ethernet. Then mserve keeps
the host awake by “touching” a specific filename on the server. A special
script called mserve_client.sh needs to be running on the host to keep it
awake.
Android Wifi FTP Server Host
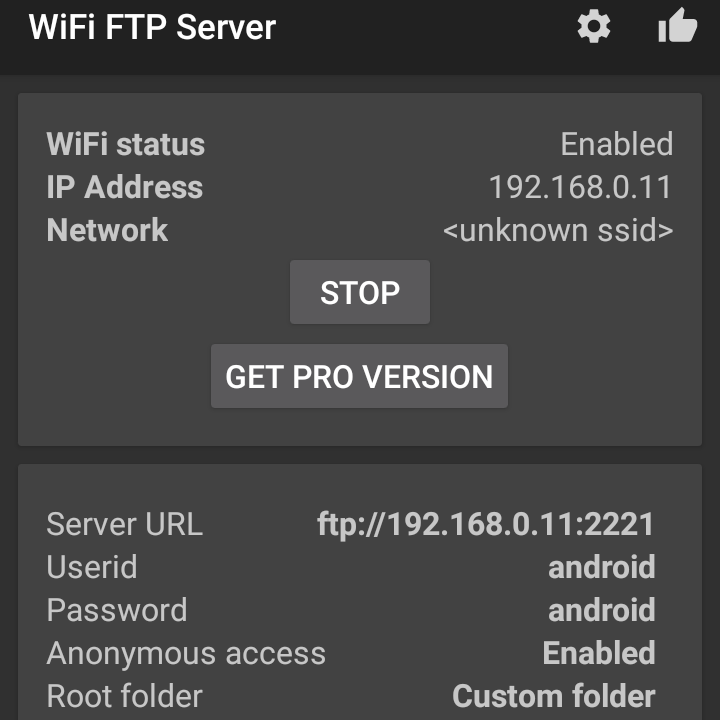
For wireless location synchronizing with an Android mobile phone,
curlftpfs is used instead of sshfs. Older versions of
mserve used sshfs but recently Android Wifi SSH Server
stopped working on Android 10 mobile phone. On August 30, 2023,
mserve was upgraded to use Wifi FTP Server instead.
These notes on Wifi FTP Server were quickly put together to meet August 31, 2023 mserve documentation deadline.
Make sure m or mserve.py is run from the command line when
synchronizing phone locations. Extra messages are printed that
do not appear in dialog boxes or the Information Centre
Install Wifi FTP Server ⧉ 🔗 from Google Play.
Initially you can accept the defaults for anonymous user and port 2221.
Grant access to the Music folder in Android. Android 10 requires you to press a weird icon to select SD Card instead of Internal Storage before selecting Music folder which exists on both medium.
The Wifi FTP Server screen will stay lit on your phone. Do not switch permanently to another Android App that will dim the screen. If you do, then mserve will report permission errors because host will be down. Of course this only applies when synchronizing. Normal phone usage doesn’t matter about Wifi FTP Server one way or the other.
In mserve Edit Location window go to the Command to wake up sleeping Host field and enter:
curlftpfs -o nonempty,uid=1000,gid=1000,umask=0022,user=android:android phone:2221 /mnt/phone
Above assumes local mount point is /mnt/phone and you have permissions
to /phone directory but not /mnt directory which is owned by root.
Above assumes your /etc/hosts contains hostname phone with
appropriate IP address such as 192.168.0.11 or whatever static IP
address you assigned with the router software.
Above assumes your user id (not user name!) is 1000. Without this, files
are mounted as owned by root.
The first time synchronization is run every file is diff checked which
takes considerable time. Then modification time stamps are synchronized
and subsequent synchronizations are 100 times faster. The first time
it takes 1.5 hours to synchronize 4,000 songs over Wifi using curlftpfs.
Subsequent synchronizations take 6 seconds for 4,000 songs (when there
are no differences).
Known Problems with curlftpfs
curlftpfs chokes on filenames containing # of %.
Quote below from: JackSlateur / curlftpfs ⧉ 🔗
Note:
This is not the official project, which can be found there: http://curlftpfs.sourceforge.net/
I just added some code the correctly handle filename which contains url-special chars (actually, just # and %) by url-encoding them :
% -> %25
# -> %23
Using that, curl will not translate them, and will target the correct filename.
When curlftpfs chokes on a file, mserve transfers the file
using ftp to compare the file to the current location.
Occasionally time-out errors are displayed in the console like this:
wait_for_cmd_output() 10 second time-out
Error on file: /mnt/phone/30 Seconds To Mars/A Beautiful Lie/10 A Modern Myth.m4a
Error: Permission denied on 'diff' check return code: 4

wait_for_cmd_output() 10 second time-out
Error on file: /mnt/phone/30 Seconds To Mars/A Beautiful Lie/11 The Battle Of One.m4a
Error: Permission denied on 'diff' check return code: 4
The reason is unknown, but when the next synchronization is run, the error doesn’t appear on the same files. To fix the error, the time-out was increased from 10 to 60 seconds. If more than 60 seconds is needed for the time-out, increase the value on line number 4034 in the file location.py:
if elapsed > 60.0: # Aug 31/23 WiFi change 10.0 to 60.0 for `diff`
Optional Remote Host Support
There are two types of remote hosts supported:
- Linux File Server supported with ssh / sshfs
- Android Mobile Phone supported with ftp / curlftpfs
Linux File Server
To debug keeping host awake, run the following commands on the host and client:
HOST - Open a terminal and enter command which runs forever:
mserve_client.sh -d
CLIENT - Open a terminal, and paste below, replacing <HOST>
with Host name:
while : ; do ssh <HOST> "cat /tmp/mserve_client.log" ; sleep 60 ; done
When the commands fusermount, nmap, nc, ssh and sshfs
are installed, extra fields appear for location details. See
screenshots below.
Ensure Music files are mounted on the Host. If you’re using Windows iTunes, and need to mount in Linux, you may need something like:
sudo mount -t auto /dev/sdb1 /mnt/music
See: https://help.ubuntu.com/community/MountingWindowsPartitions
Make sure your SSH is using the standard port 22. Otherwise, you
will have to open location.py and search on 22 > and 22/tcp.
Never use -odebug option for sshfs from mserve because it will
lock up. Use debug only from command line for testing. mserve
will not let you define this debug option.
More details: https://help.ubuntu.com/community/SSHFS
Android Mobile Phone
Older versions of mserve supported ssh on mobile but the Android application Wifi SSH Server no longer supports sshfs. In September 2023, mserve switched to FTP for mobile phones, with local filename caching.
Install Wifi FTP Server ⧉ 🔗 from Google Play.
More details on using FTP are above.
Initially FTP startup time was 5 minutes in mserve. Subsequently file-caching was utilized and startup time is now a few seconds for 4,000 music files.
Problems still exist using curlftpfs which hasn’t been updated in
9 years. For example, go to Location Music Tree (main window) and
select the View Dropdown Menu. Then select the SQL Music Table
option, and then the
Update Metadata button. All files with # in the name are reported
as: “1) Not a music file.”. These files:
- Do not have their metadata automatically updated by the Update Metadata function
- Have to be manually played for a second, to have their metadata updated into the mserve SQL database
Test Remote Host Status Display
These steps are followed when a remote host is tested:
- If the host was active less than 10 minutes ago,
ncis run - If the host has been inactive for more than 10 minutes,
nmapis run - After
ncornmappasses test, the music top directory is mounted - After mounting, mserve checks that artist subdirectories exist
- After validation, scroll up to review results
- For FTP Hosts, there can be thousands of results to review, so use: Ctrl + Home and Ctrl + End.
- After review, click the Close Test Results button
Note: When synchronizing a remote host location, the same test is automatically run.
Sample Synchronize Location Test Host Video
The above video demonstrates:
- You cannot synchronize a location to itself (L004 is currently open)
- The Test Host button replaces the top frame with location treeview with a new frame with old-style TTY terminal output.
- Information messages are in green font with highlights in yellow font.
- It takes 5.8 seconds for
nmapto test if host is connected to network. nmapconsole results are shown inside the GUI window.- mserve reports that host “dell” can be accessed but is NOT awake.
- It takes 7 seconds for
wakeonlanto wake up host. ssh dell lsis run on host “dell” until files appear in output.- The Music Top Directory
/mnt/musicis already mounted from earlier tests. If it wasn’t mounted, then mserve would mount it now. - After the test is completed, the mouse wheel is used to scroll up and down the status results display frame.
- After reviewing results, the Help Test button is clicked. The bottom-right corner of a new browser window partially covers the test window. The browser window is dragged over-top.
- This is where the video ends, but after the Close Test Results button is pressed and the regular buttons and location treeview frame appear.
Synchronize Location
When locations are synchronized, new files are NEVER added, and old files
are NEVER deleted. If you would like to test the function first, review
the script test_for_synch.sh.
Sample Synchronize Location Window
Below is a sample screen where the selected location is highlighted in green:
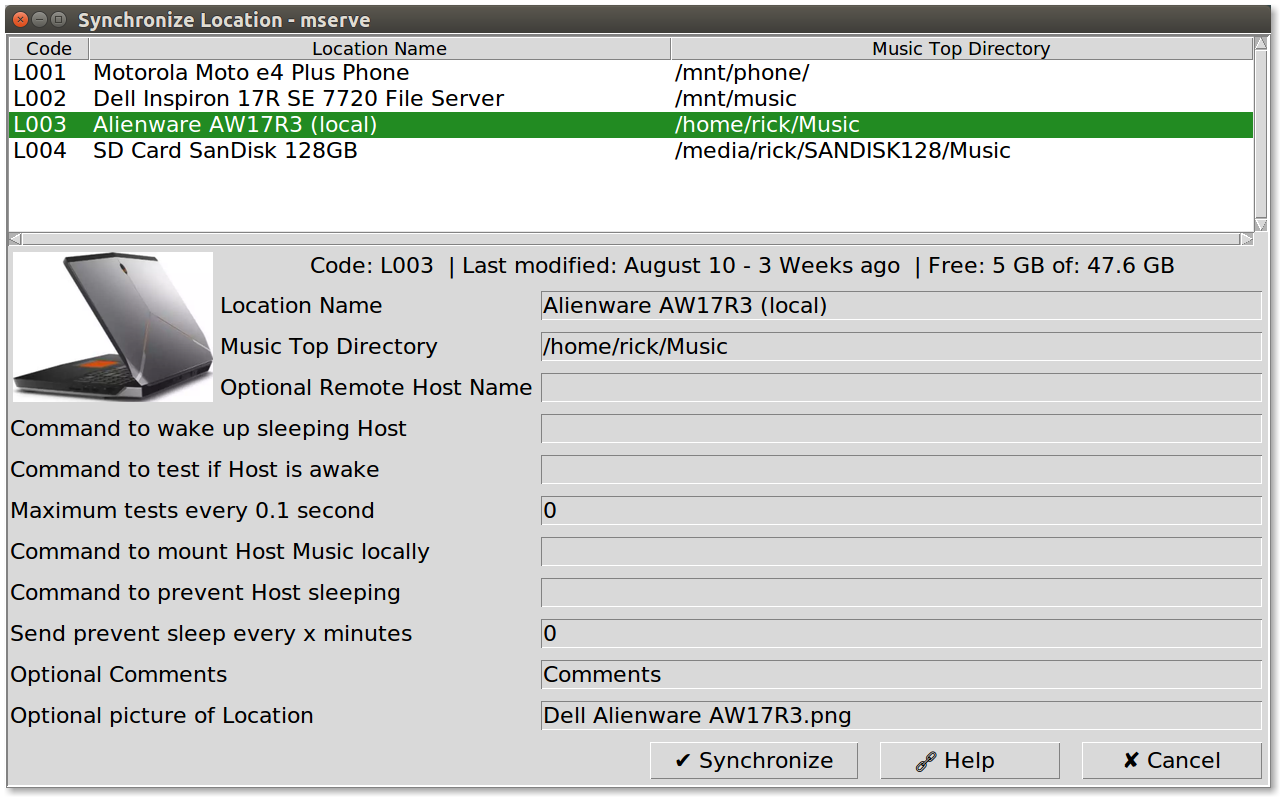
-
When the “⧉ Help” button is clicked you are brought to this web page.
-
When the “✘ Close” button is clicked the window is closed. The same is true if
Escapekey is pressed or the window’s “✘” button is clicked.
The steps below describe what happens when the “✔ Synchronize” button is clicked.
Synchronize Location Actions
A quick test is made to see if files have the same modification time and same size. If so the next file is checked.
If files have the same size but different times, the diff command is
used to test every byte to see if they are different. If the files
are identical, the modification times are set the same to the oldest
modification time. The rationale is a new location was created, files
were copied from an original location and the operating system reset
the modification time to the current time.
If the files have the same time but different sizes or different contents, an error message is displayed because mserve has no clue which direction to copy files in.
If files are different, then the file with the newest modification time is copied over the oldest.
Before copying you are always given a chance to review action plans.
Below is an example of the action plan window:
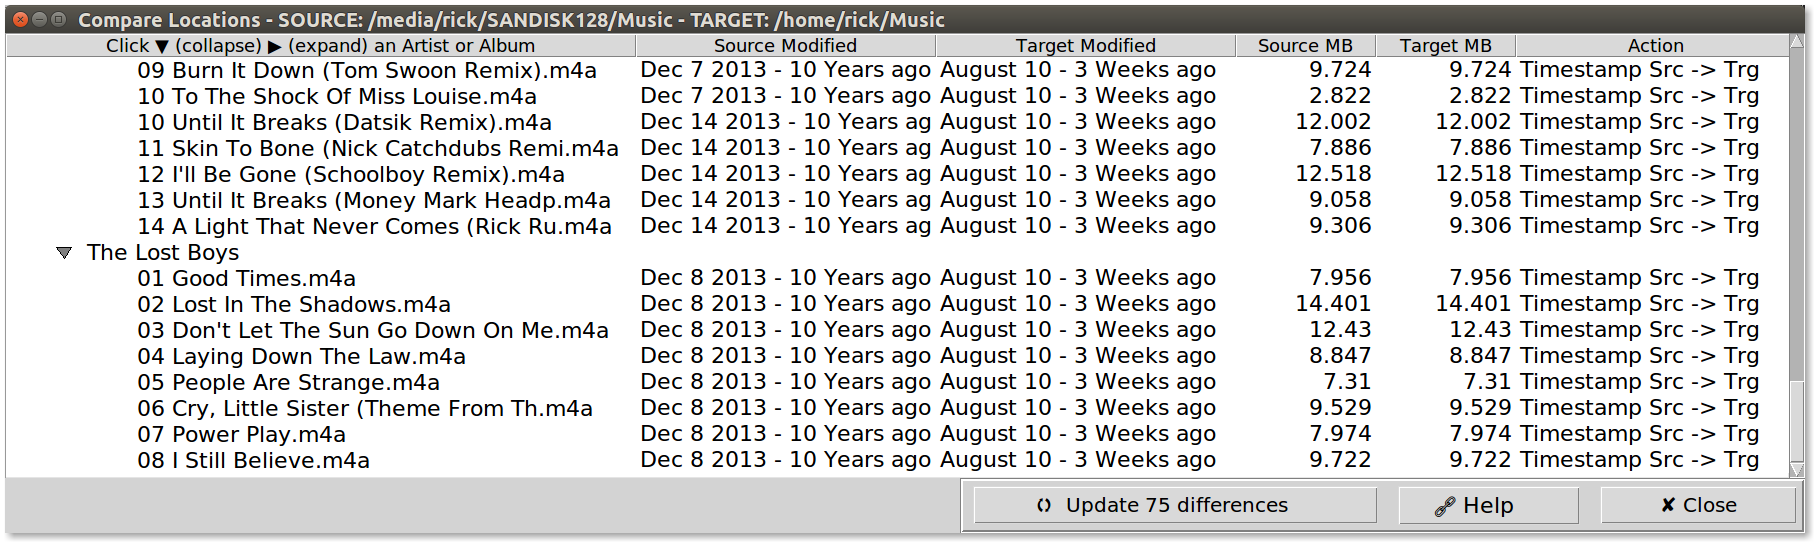
The “Action” column states the reason for updating is that the file size has increased. This was due to album artwork being added to the source files.
Here’s a list of actions. All appear in “Action” column except those denoted as “hidden”:
- “Missing” - In target(other) location (hidden from view)
- “Same” - within 2 seconds so no action required (hidden)
- “Error: Size different, time same” - Don’t know copy direction
- “Error: Permission denied on ‘diff’ check”
- “Error: Contents different, time same” - Don’t know copy direction
- “OOPS” - Programming error that should never happen (hidden)
- “Copy Trg -> Src (Size)” - Based on size difference
- “Copy Src -> Trg (Size)” - Based on size difference
- “Copy Trg -> Src (Diff)” - Based on file difference
- “Copy Src -> Trg (Diff)” - Based on file difference
- “Timestamp Trg -> Src” - Prevents future checks
- “Timestamp Src -> Trg” - Prevents future checks
The “Src”/”Source” location is the location currently opened in mserve. The “Trg”/”Target” location is the location that was picked to synchronize with.
The “OOPS” should never appear but is technically possible if another job is running that updates files in the Source or Target Location.
Note: For Remote Hosts, the linux cp command is used
not the SSH scp command.
For Android mobile phones the last modification time (used to compare files) may not work properly. In this case, mserve creates a virtual modification time file to track what modification times should be.
Analyze Volume
ffmpeg is used to analyze volume levels. Two functions are provided:
- Analyze Maximum Volume using the
'volumedetect'Filter - Analyze ‘loudnorm’ Filter using results from Analyze Maximum Volume
Under Development.
Sample Analyze Volume Windows
Under Development.
Analyze Volume Actions
Under Development.
Playlists
Playlists are stored by location. Each location can have an unlimited number of playlists. Each playlist can have an unlimited number of songs, but only songs from the current music location.
Below is a sample Playlist Maintenance window from the Rename Playlist function:
Sample Rename Playlist Window

The Playlist name cannot be blank and must be unique per location. A warning is issued when the Playlist name has been used in another location.
The Playlist description is optional.
The Device location code is automatically assigned.
The columns for “Song Count”, “Size of Files” and “Duration” are automatically calculated as songs are selected and deselected in Music Location Tree checkboxes.
Five functions share the same Playlist Maintenance window:
- Open Playlist, called from the File dropdown menu
- New Playlist, called from the File dropdown menu
- Rename Playlist, called from the Edit dropdown menu
- Delete Playlist, called from the Edit dropdown menu
- View Playlists, called from the View dropdown menu
YouTube Video with LRC Synchronized Lyrics
The screen below shows LRC (Synchronized LyRiCs) playing in mserve with the YouTube window dragged overtop.
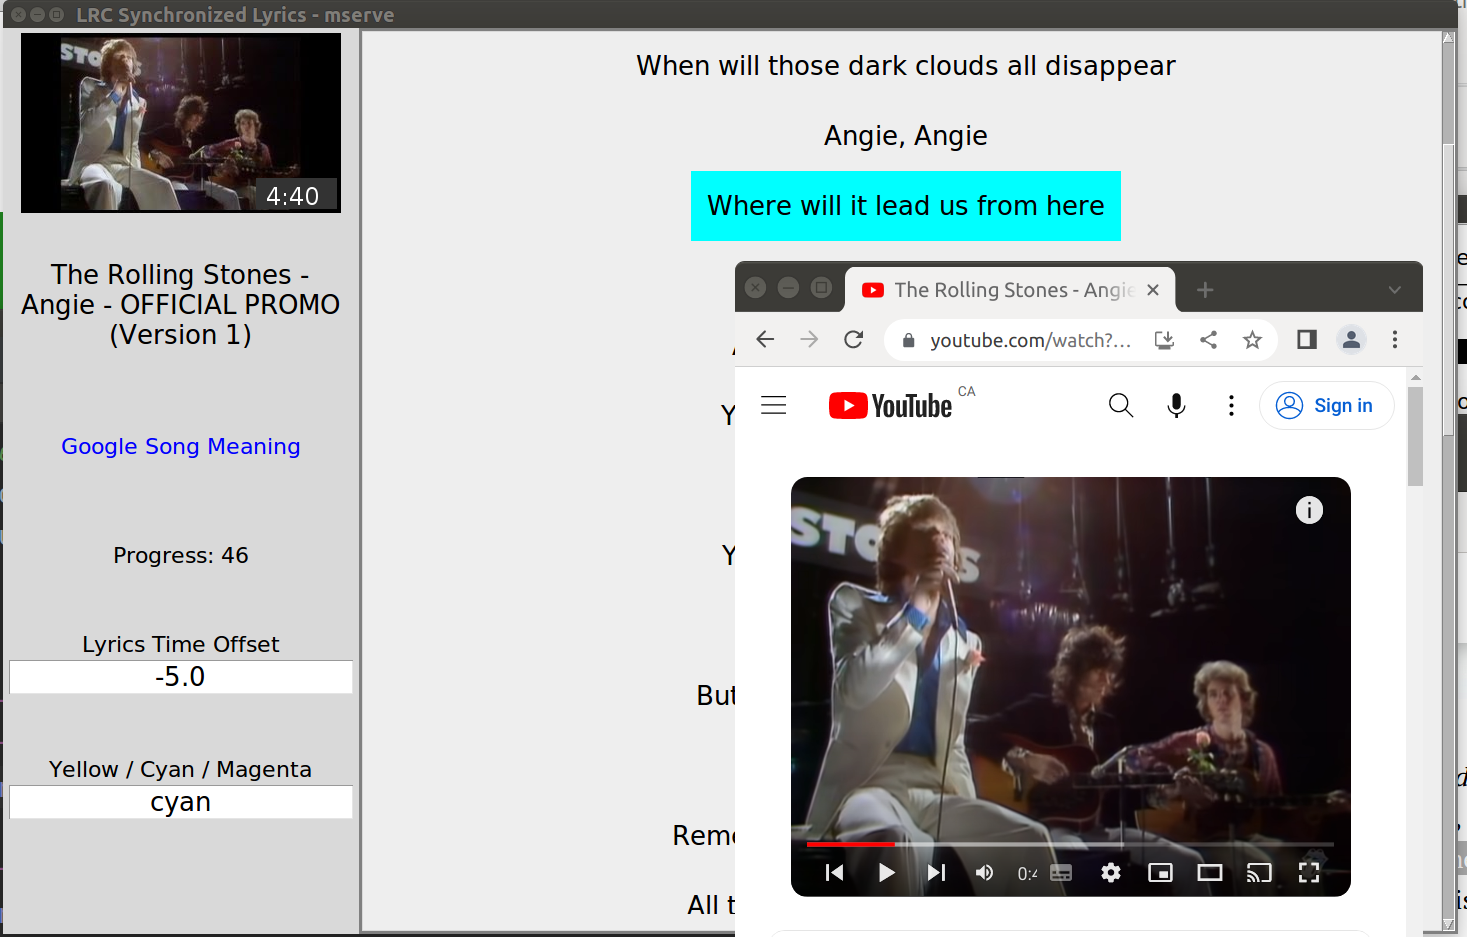
NOTES:
mserve will save any changes to the Time Offset or Color and used it the next time the same song is played.
The Time Offset should only be a few seconds (in the case above it is
-5.0seconds.To create the LRC (Synchronized lyRiCs), right click on the song in the playlist and select “Copy Name”. Then in your web browser, paste it in your address bar. Find the LRC website (E.G. Megalobiz.com) and open it. Find the best matching LRC, usually with the same or close duration. Then copy the LRC lines to the clipboard. Return to mserve, right click on the song and select “Paste LRC”.
The “Copy Name” and “Paste LRC” right-click menu options are only available when Smart Play Playlist is running.
mserve Smart Play YouTube Playlist
The screen below shows the mserve Smart Play Playlist window with a YouTube Playlist window next to it.
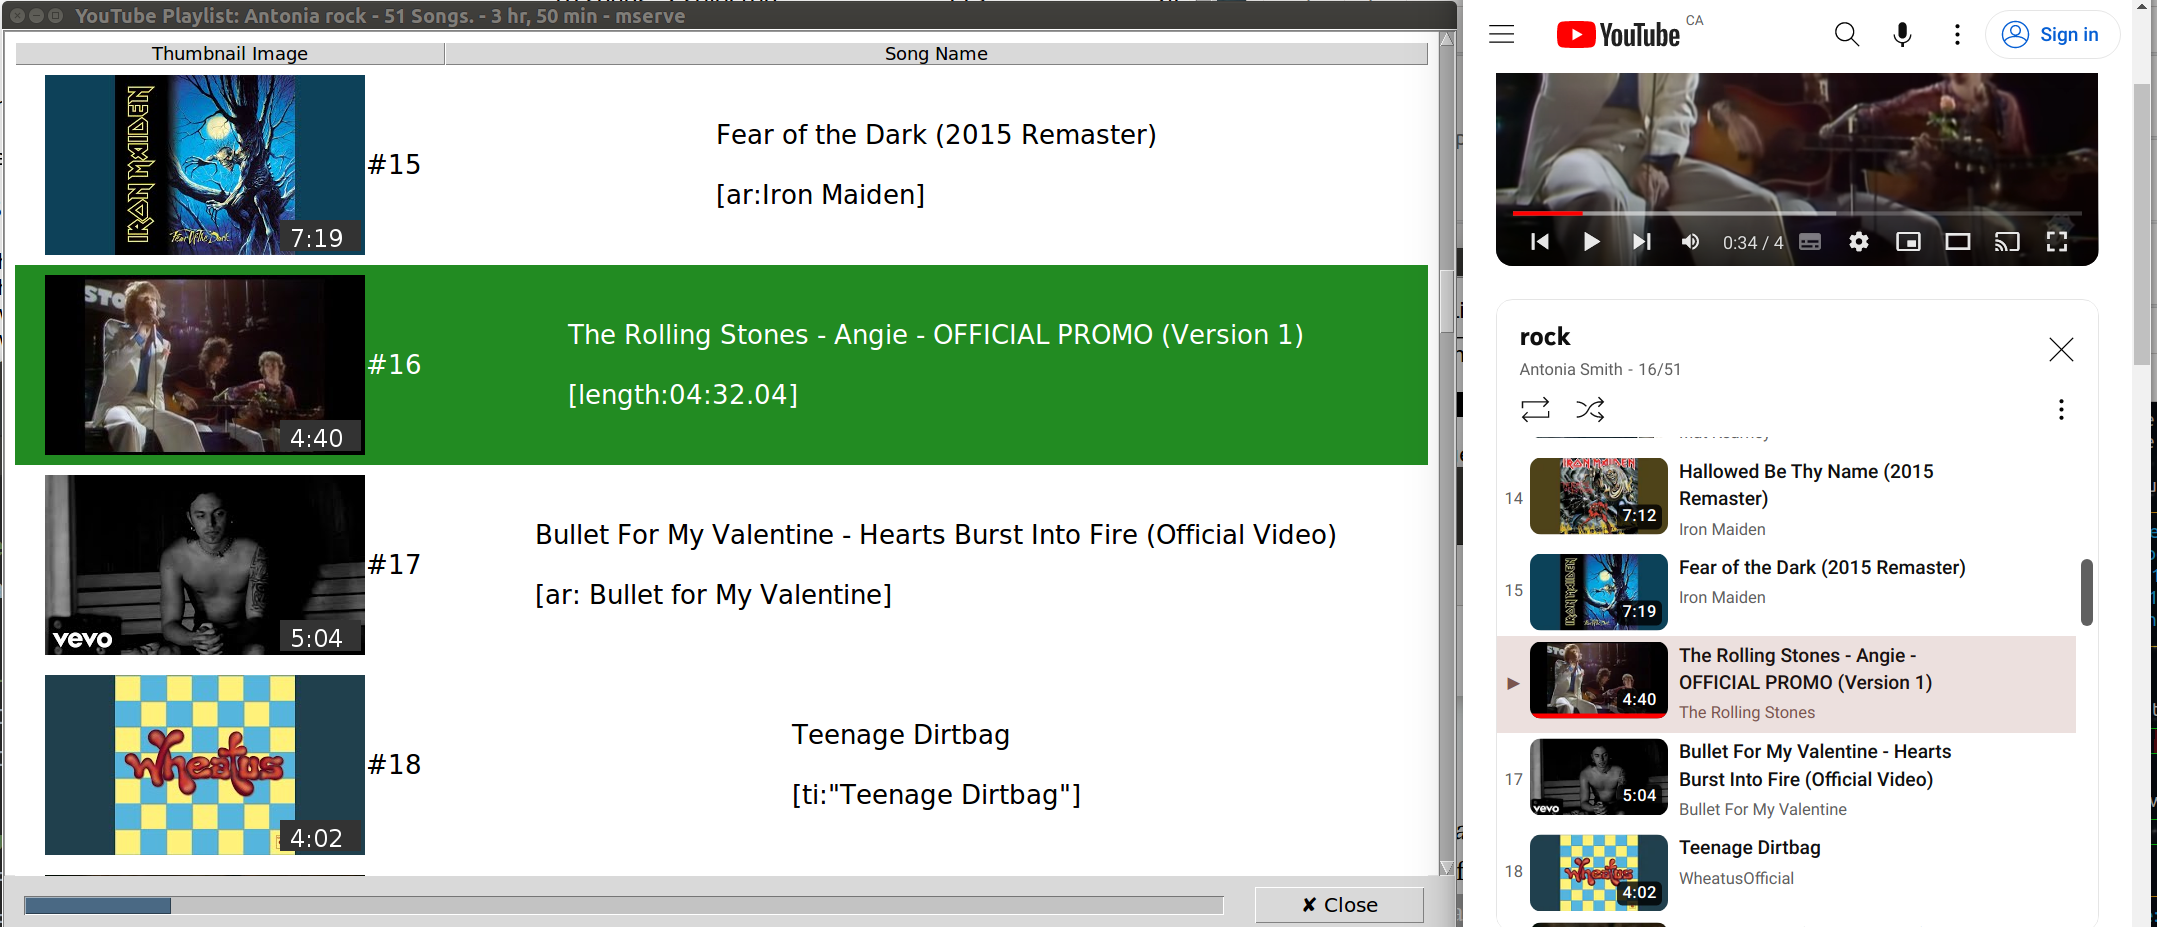
Hockey TV Commercial Buttons
When mserve starts, the Rewind 10 seconds and Fast Forward 10 seconds buttons are active. You can change these buttons to Stanley Cup Hockey Playoff TV Commercial buttons.

.gif (there is no sound) Highlights:
- From the Music Location Tree window select the Tools dropdown menu.
- When FF/Rewind buttons are visible you have the option of enabling the Hockey buttons.
- The Hockey TV Commercial button turns down TV commercial and resumes mserve play for 90 seconds.
- The Hockey TV Intermission button turns down TV commercial and resumes mserve play for 18 minutes.
- When Hockey TV commercial buttons are active you have the option of restoring the FF/Rewind buttons.
This .gif also shows how the Show/Hide
Chronology button places song lyrics in a suitable location
when the artwork size changes.
Using Hockey TV Commercial Button
This video shows what you see and hear when you click one of the Hockey TV Commercial Buttons.
Video Highlights:
- On the left is Big Screen TV with Hockey Game airing in full screen mode
- On the right is a 4K TV running mserve
- The Hockey TV Commercial button is clicked and the left TV goes “non-Full Screen”
- A man falling into water appears on the left TV
- A shark outline appears mimicking mserve on the right TV
- The shark swims right to left to gobble up the falling man
- mserve moves to left TV and right TV has outline where mserve will return to when hockey commercial countdown ends
- The Commercial and Intermission Buttons change with text that counts down time remaining until Hockey Game resumes. Click either button to end the countdown immediately
- When hockey countdown ends the Big Screen TV returns to full screen and the Music Player window goes back to it’s original location on the 4K TV.
Hockey TV Commercial Button Without compiz
This video shows what you see and hear when you click
one of the Hockey TV Commercial Buttons and compiz
code is commented out.
Hockey TV Commercial Sample Video Highlights
- On the top left is Big Screen TV with Hockey Game airing in full screen mode
- On the top right is a 4K TV running mserve
- On the bottom is laptop screen with mserve play running.
- The Hockey TV Commercial button is clicked and the top left TV goes “non-Full Screen”
- A man falling into water appears on the left TV
- A shark outline appears mimicking mserve on the right TV
- The shark swims up then right to left to gobble up the falling man
- The shark momentarily stops and then jumps between right TV and left TV. This reflects fact that Compiz is disabled. See code below
- mserve moves to top left TV and bottom right Laptop has outline where mserve returns to when hockey commercial countdown ends
- The Commercial and Intermission Buttons change with text that counts down time remaining until Hockey Game resumes. Click either button to end the countdown immediately
- When hockey countdown ends the Big Screen TV returns to full screen and the Music Player window goes back to it’s original location on the laptop screen (bottom right).
- Hockey countdown is prematurely ended in this example by clicking “Time remaining” button and selected “Yes” to confirmation question to end early.
Although it doesn’t look as nice with the shark “jumping” between
monitors, it works more reliably. To disable gsettings and the
compiz option to disable place windows (which allows for smooth
shark movement across monitors but leads to instability), open the
file image.py and around line 1119 comment out the code:
# Removing "place" from gsettings allows smooth shark movement over
# monitors. However there are screen resets with disappearing windows
# for a couple seconds from time to time. Keeping "place" has shark
# stop at monitor border then "jump" into the next monitor.
'''
if "'place', " in self.old_compiz_plugins:
    self.place_in_plugins = True
    override = self.old_compiz_plugins.replace("'place', ", '')
    #print('override:', override)
    self.set_gsettings(override)
'''
mserve Volume During TV Commercials
This image shows mserve volume (ffplay) is at 60%:
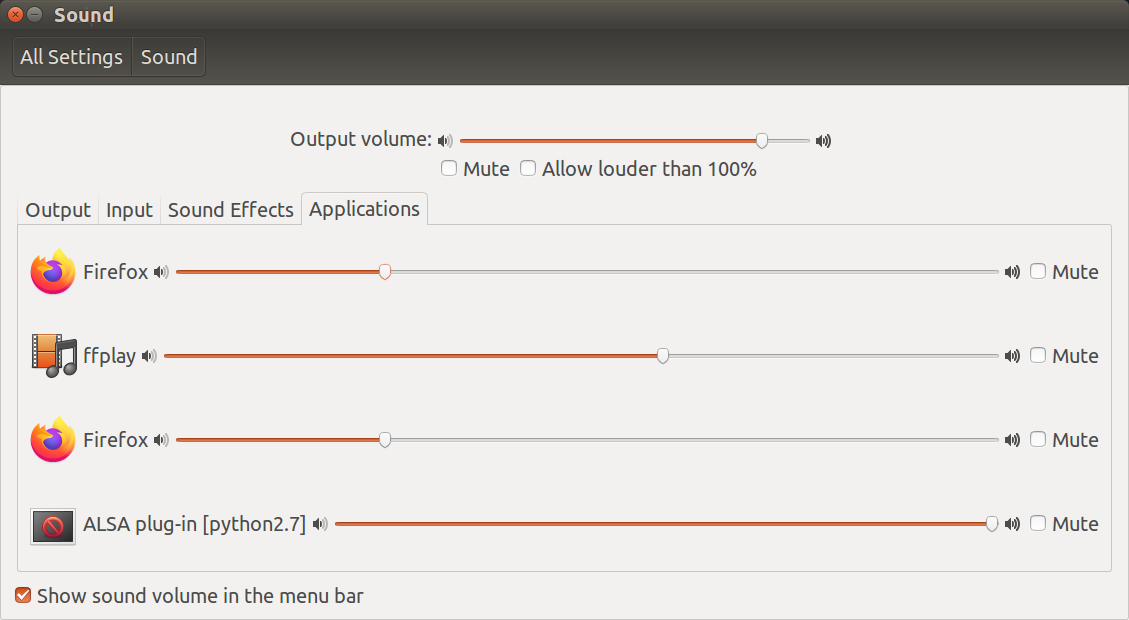
- The TV volume (reflected by Firefox) is 25%
- mserve volume (reflected by ffplay) is 60%
When TV commercial ends, TV volume returns to 100% in 10 steps over 1/2 second. Music is paused in mserve and volume is reduced from 60% to 25% in 10 steps over 1/2 second.
As of June 11, 2023, mserve TV Commercial volume is initialized
at 60% on line 401 in mserve.py:
TV_BREAK1 = 90          # Hockey TV commercial is 90 seconds
TV_BREAK2 = 1080        # Hockey TV intermission break is 18 minutes
TV_VOLUME = 60          # Hockey music play 66% of mserve volume level
TV_SOUND = "Firefox"    # Hockey broadcast is aired on Firefox browser
60% was found to be a suitable volume level for CBC broadcasts
of the NHL Stanley Cup Playoffs. YMMV. Note that TV_VOLUME is
a short name. A full name would be something like: “mserve volume
when playing during hockey game muted TV commercials”.
FYI the “ALSA plug-in [python2.7]” sound processor is used by
mserve to display the VU meters (vu_meter.py). Configuring the
VU Meters using system output loopback to input stream is described
in the next section.
Configure mserve Volume During Muted TV Commercials
To set the mserve volume during muted TV commercials, click the Edit dropdown menu and select Volume During TV Commercials:
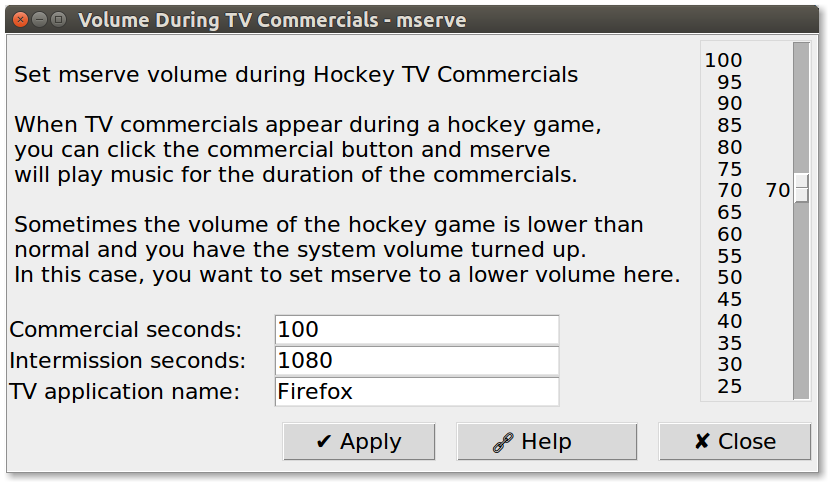
This window changes the program variables shown in the last section.
Every location and every playlist within every location has a separate volume control for mserve when TV commercials are muted by mserve.
VU Meters
The VU Meters show in mserve need to be configured using
pavucontrol (Pulse Audio Volume Control). Before we dive
into pavucontrol though, the screenshot below shows
how Ubuntu 16.04 displays sound output devices. This is for
comparison purposes and to show you a screen you may already
be familiar with.
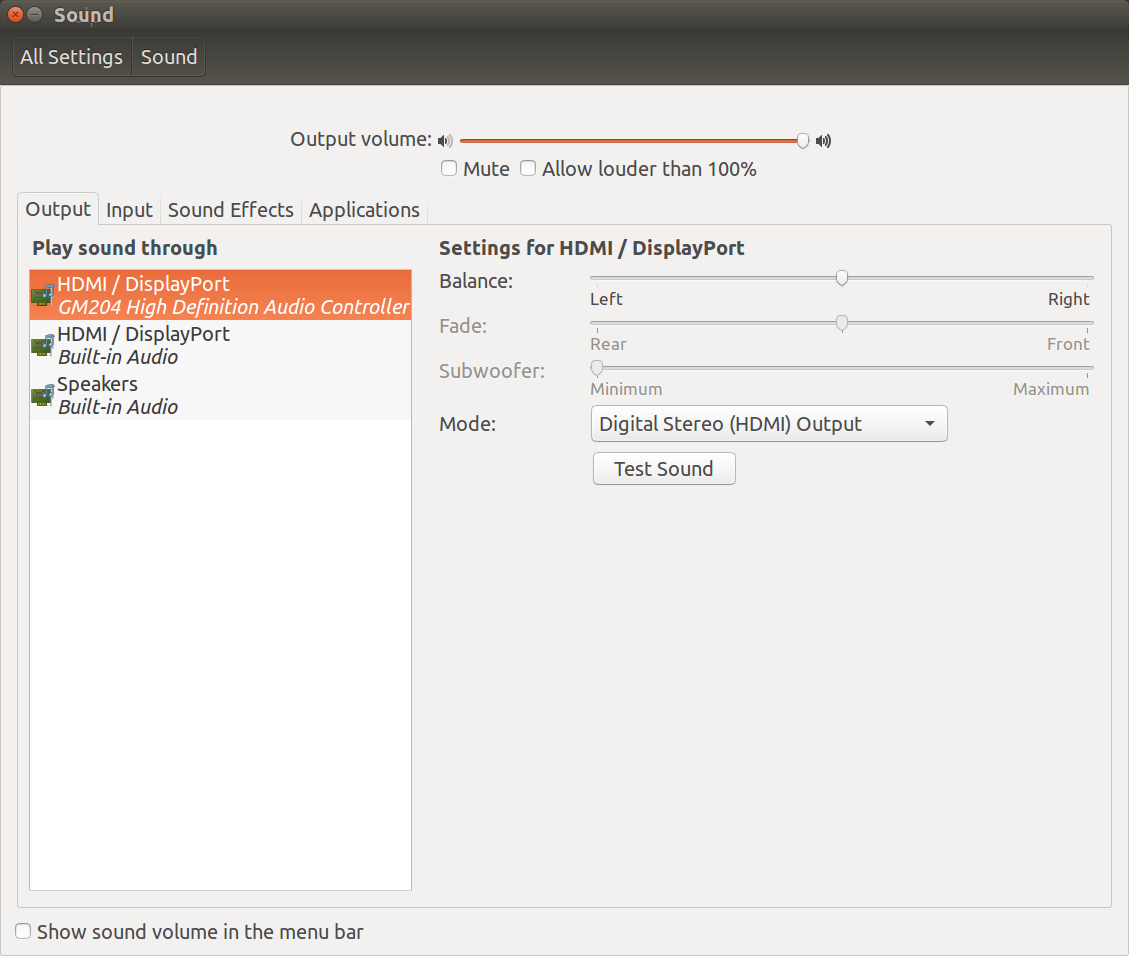
In the example mserve application used on this webpage, the first output device called “GM204 High Definition Audio Controller” is usually used for sound output. This belongs to a 50” big screen Sony TV with good sound system including a sub-woofer. The soundcard (chipset) is located on a Nvidia 970M discrete graphics card.
The middle output device is “HDMI / DisplayPort - Built-in Audio”. This sound device is 43” 4K TCL / Google (Android) TV. The sound card is built into Intel Skylake (Thunderbolt 3) USB-C to HDMI converter plug.
The bottom output device is “Speakers - Built-in Audio”. These are sub-par speakers on a laptop. The only time they would be used if the laptop was unplugged from the local network (LAN). The soundcard is built into onboard Intel chipset.
pavucontrol Sound Output Loopback to Microphone
In order for VU Meters to work in mserve, The Pulse Audio Volume Control GUI application (pavucontrol) is used.
Pulse Audio Volume Control Sound Output
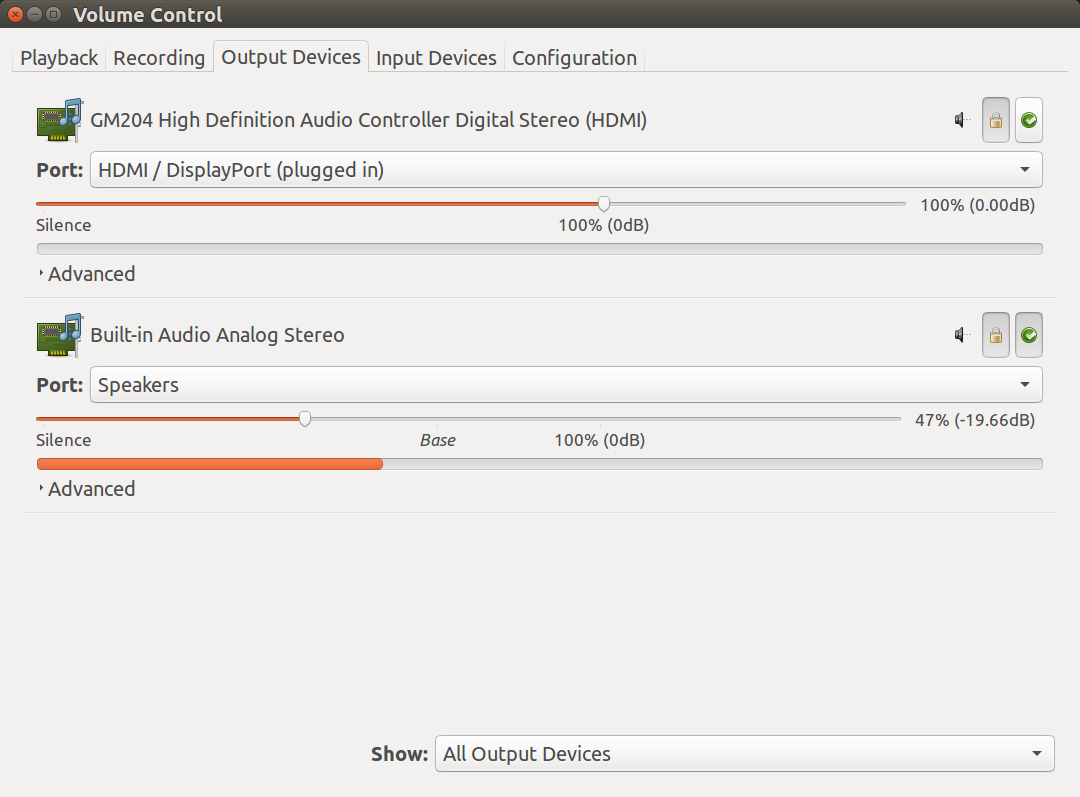
This screenshot shows the Pulse Audio Volume Control’s Output Devices Tab. In this example, the output was changed from the first device to the Built-in Audio speakers. The changes were made from the Ubuntu 16.04 Sound System Settings panel show in the previous section.
Notice the thick progress bar. It displays the sound playing on the output device and jumps very quickly. Progress bar activity is how you can confirm the active output device is selected.
When the output device is changed, the recording device must be changed for the VU meters to display the correct output sound device. (See the next section)
Pulse Audio Volume Control Recording Tab
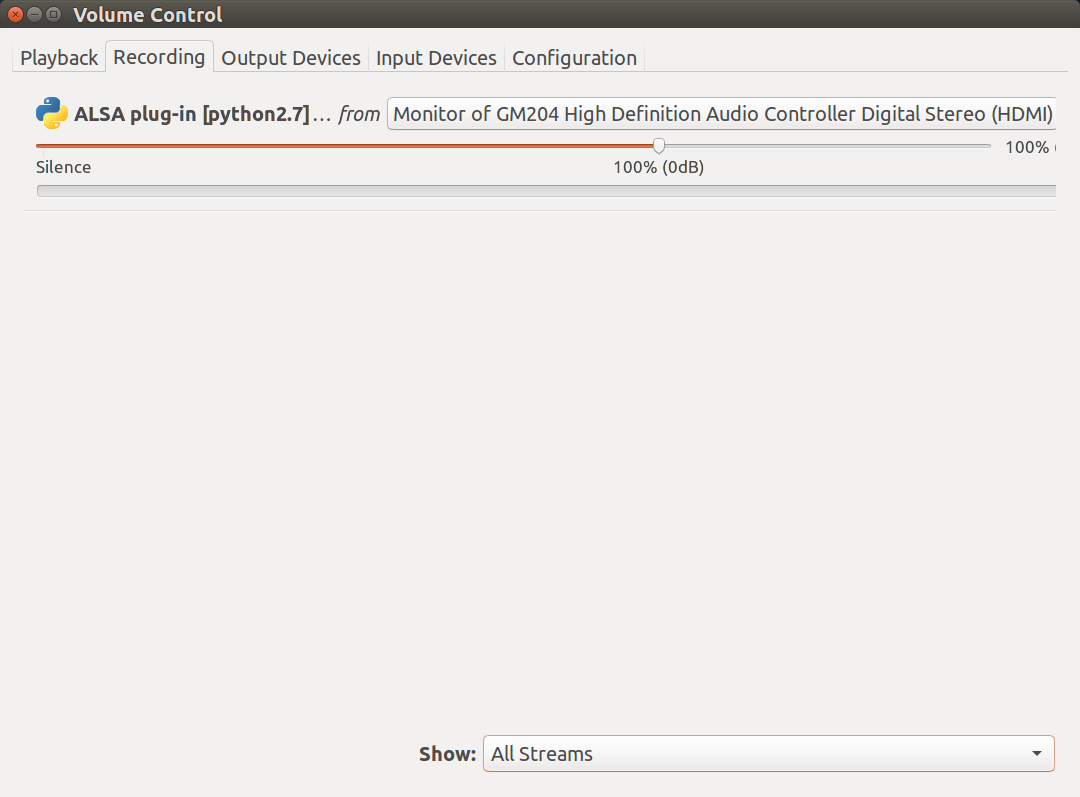
This screenshot shows the Pulse Audio Volume Control’s Recording Tab.
Notice the thick progress bar at the bottom indicates no sound is being recorded. That is because it is listening to the wrong stream: “Monitor of GM204 High Definition Audio Controller Digital Stereo (HDMI)”. This stream is for the 50” Sony TV connected to Nvidia 970M card.
Remember in the last screenshot we used Ubuntu’s sound setting to change output from 50” TV to built-in laptop speakers.
Pulse Audio Volume Control Change Recording Source
The sample video shows the Pulse Audio Volume Control Recording Tab.
The stream “Built-in Audio Analog Stereo” is selected. Notice the thick progress shows sound volume level changes.
Then the stream name “Monitor of GM204 High Definition Audio Controller Digital Stereo (HDMI)” is selected.
When you change the output device loopback to recording; YOU MUST RESTART mserve. Otherwise the VU meters will merely be blank.
Credits and References:
- Ubuntu Wiki - record_system_sound ⧉ 🔗
- GitHub
vu_meter.pySource Code ⧉ 🔗 - kmein GitHub original VU Meter Source Code ⧉ 🔗
Tools Dropdown Menu Examples
The Tools Dropdown Menu is found on the Music Location Tree Window.
These are the options in the Tools Dropdown Menu:
- Enable TV Commercial Buttons - this option is documented above.
- Big Number Calculator - is a calculator that accept Kilobytes, Megabytes and Gigabytes as Units of Measure. This is helpful so you don’t have to enter or view numbers over 1,000. You can easily deal with numbers past Terabytes and Petabytes. It is an Indispensable calculator for math equations using MB (Megabytes), GB (Gigabytes), TB (Terabytes), etc.
- Make LRC For Checked Songs - will create an LRC (
.lrc- synchronized lyrics) file for every checked song in the Music Location Tree. This only applies to songs that have a lyrics score web scraped and where you have clicked on 80% of the lines to synchronize them. - Copy Checked To New Location - will copy both the LRC (
.lrc- synchronized lyrics) file AND every checked song in the Music Location Tree. If there is no LRC file, the original music file is still copied. The new location must be empty. For locations already containing music the synchronize location function must be used instead. That ensures the correct direction for copying files. To update LRC files in locations already containing music, use Open Location and Play, then use the Make LRC For Checked Songs option. - Debug Information - displays internal mserve information which is useful to software developers.
Sample Make LRC For Checked Songs Video
The Make LRC For Checked Songs feature will create an LRC (.lrc -
synchronized lyrics) file for ever checked song in the Music Location
Tree. This only applies to songs that have a lyrics score web scraped
and where you have clicked on 80% of the lines to synchronize them.
Make LRC For Checked Songs Sample Video Highlights
- The video starts out showing the Music Playing window covering most of the Music Location Tree window
- The cursor moves to the top-left corner of the Music Location Tree window
- The Tools Dropdown Menu is opened
- The Make LRC For Checked Songs function is selected
- An information dialog box is displayed
- The
Yesoption is selected to proceed - The Music Playing window is selected again to show how music keeps playing during LRC file creation
- While the Make LRC For Checked Songs is running, the Music Player window has reduced number of buttons. All processes in mserve that take a long time to run will have the same restriction. When the long running process ends, the Music Player window buttons are fully restored.
NOTES:
- Only songs with 80% or more lyrics synchronization are selected
- LRC files are created for the current location. For other locations you must open the location and repeat the process
- LRC files are not used inside mserve they are created for other music players like Musicolet ⧉ 🔗 Musicolet is a small yet powerful offline Music Player for Android, which organizes and plays local audio-files stored on your device.
Big Number Calculator Sample Video
Dealing with large numbers can make the mind numb. For example, the average drive of 1 Terabyte is 1000000000000 bytes. An average video of 4 Gigabytes is 4000000000. An average song of 8 Megabytes is 8000000 which is a little easier to type and read. However, it’s much easier with the Big Number Calculator.
In this video, we have 3,800 songs and we need to buy a USB stick to hold the music. What size should we buy?
Big Number Calculator Sample Video Highlights
- The video starts out showing the top-left corner of the Music Location Tree window
- The Music Playing window is briefly dragged into view
- The Dropdown Menus are highlighted by the cursor
- The Tools Dropdown Menu is opened
- The Big Number Calculator function is selected
- Enter
3800x8Mfor 3,800 songs times 8 megabytes - Click = to calculate the result
30.4 G(Thirty Gigabytes) is required to hold 3,000 songs
NOTES:
- Decimals can’t be entered. Therefore,
3.8 Kmust be entered as3800.- Although the video shows the mouse clicking buttons, you can also type using your keyboard.
- Upper-case M or lower-case m can be entered
- You can add or omit spaces between digits and letter. e.g.
8Mor8 m- The Big Number Calculator can be run stand-alone by calling
calc.py. You may have to mark it as an executable first usingchmod a+x calc.py.
Debug Information Sample Screen
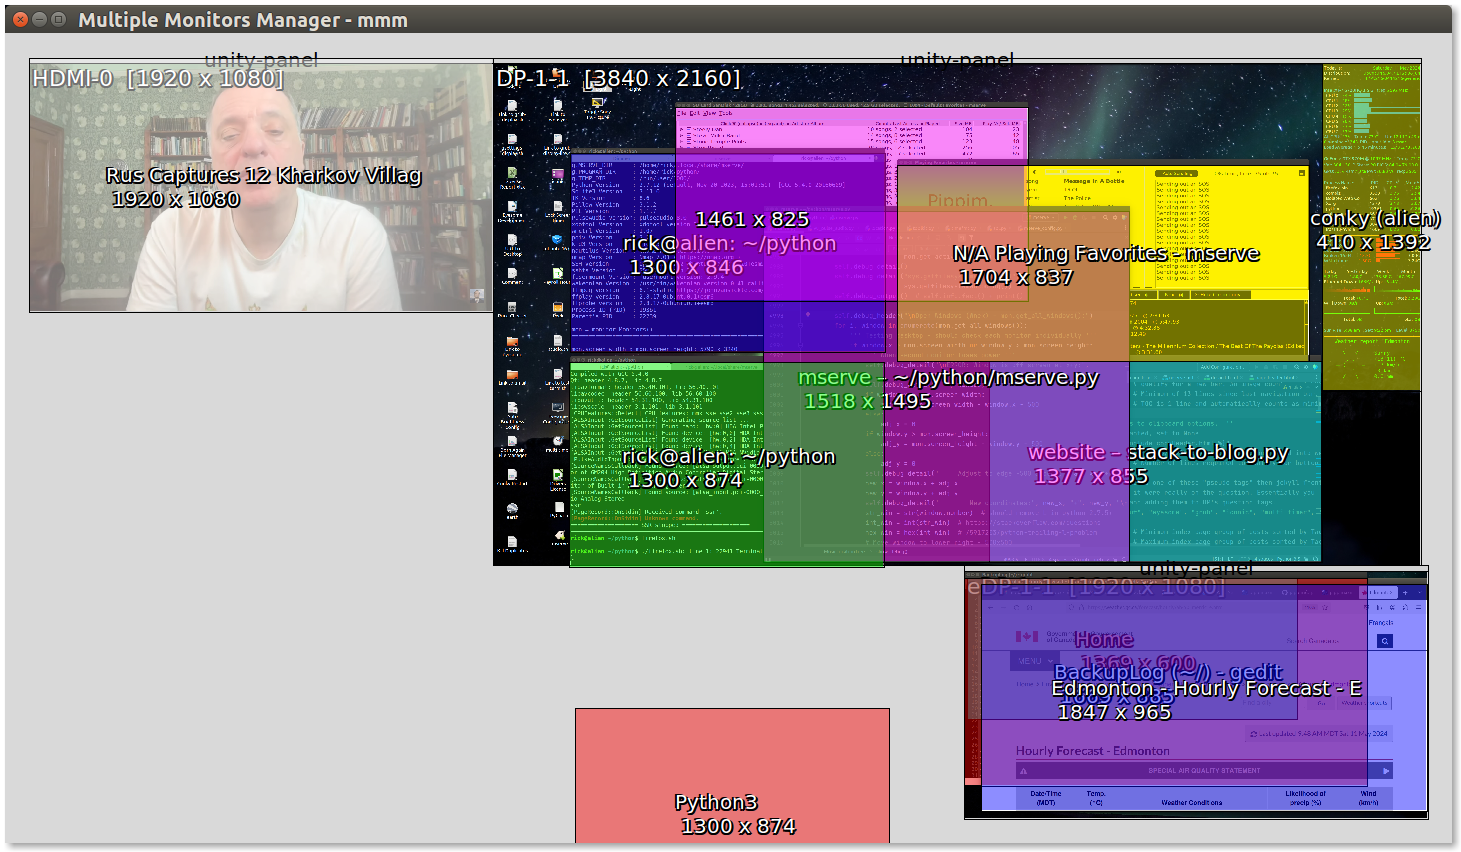
This screenshot shows how a window can be outside a monitor’s viewable area.
Notice the window “Python3” is in the white area’s bottom central region. The white area is a “dead-zone” around the three monitors.
A window can enter the dead-zone when a monitor is disconnected from the computer.
Debug Information Sample Screen Notes
NOTES:
System panels and windows can intentionally have negative x and y coordinates. These are not touched by mserve.
All invisible application windows are moved into visible area.
mserve picks the closest monitor to move an invisible window to.
The program;
xdotool, is used to move invisible windows.Output in console and information centre will show:
monitors.py Monitors().get_home_monitor(): x: 2261 y: 2740 w: 1300 h: 902 x2: 3561 y2: 3642
name: Python3
monitor.name: HDMI-0 monitor.x: 0 +y: 0 height: 1080 width: 1920 x2: 1920 y2: 1080
monitor.name: DP-1-1 monitor.x: 1920 +y: 0 height: 2160 width: 3840 x2: 5760 y2: 2160
monitor.name: eDP-1-1 monitor.x: 3870 +y: 2160 height: 1080 width: 1920 x2: 5790 y2: 3240
closest_x: eDP-1-1 closest_y: eDP-1-1
- A few lines down their is further output:
home_mon: Monitor(number=2, name='eDP-1-1', x=3870, y=2160, width=1920, height=1080, primary=True)
window: Window(number=92274698L, name='Python3', x=2261, y=2740, width=1300, height=902)
ERROR: Window is off screen at x + y: 2261 + 2740 x_cutoff: 5740 y_cutoff: 3190
Window(number=92274698L, name='Python3', x=2261, y=2740, width=1300, height=902)
Adjust to coordinates: 3920 + 2740
This screenshot shows how the window was forced back into the nearest monitor’s viewable area.
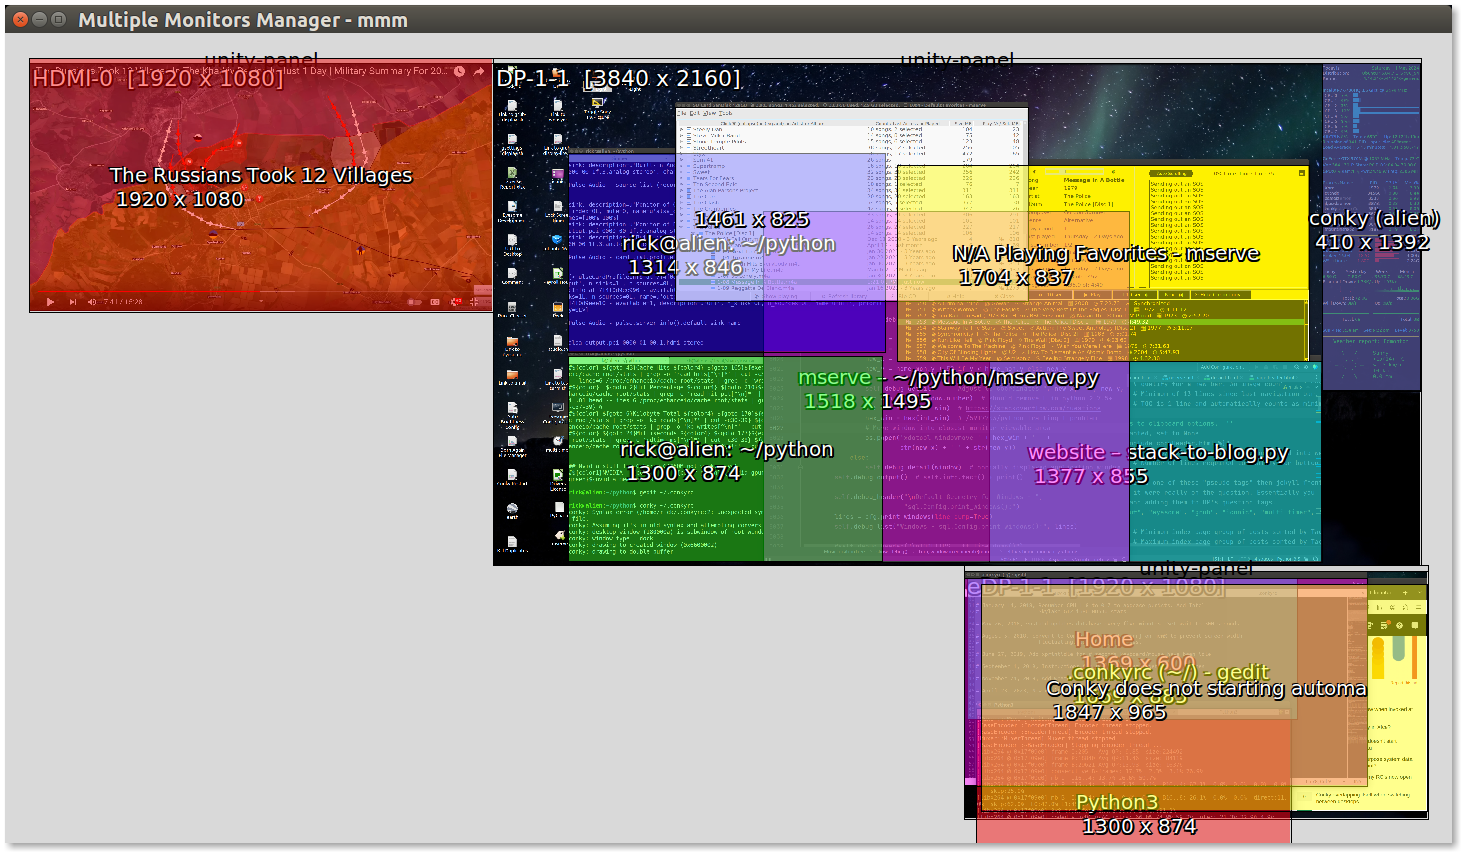
This screenshot shows how the window named “Python3” was moved into the third monitor on the lower right.
The window “Python3” is no longer in the “dead-zone”.
The process of moving windows out of the dead-zone is run when the Debug Information option is picked from the Tools Dropdown Menu