Introduction
Do you have a job with a fixed set of tasks and, each task always takes the same amount of time?
Then Multi-Timer will help you get the job done with no wasted time!
Multi-Timer is called with mt from
the command line or a Desktop Shortcut that calls mt.
The Multi-Timer program (mt) can be downloaded from the
Pippim Multi-Timer Repository 🔗.
IMPORTANT NOTE:
Version 0.2.0 was released on February 19, 2022 and not tested with WSL (Windows Subsystem for Linux).
Table of Contents
- Introduction
- Running Multi-Timer
- Installing Multi-Timer
- Optionally Modify Multi-Timer Source Code
- Dependencies
- Create a Second Configuration File
- Increasing Maximum Number of Timers
- Future Plans
Running Multi-Timer
Running Multi-Timer is as easy as typing mt at the command line. Or simply
clicking a Desktop Shortcut linked to Multi-Timer.
One-Time Configuration
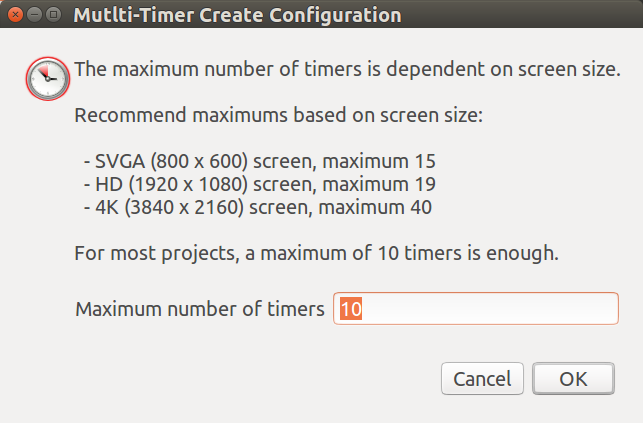
The first time you run Multi-Timer you need to specify the maximum number of timers (alarms) you will be using. The window on the left greets you the very first time you run Multi-Timer.
Chances are you will never need more than 10 consecutive timers. However, you can can define up to 40 if, your screen size permits that many.
Once the maximum number of timers is set, you cannot change it.
Your only recourse is to remove the configuration file,
(using rm ~/.config/mt.conf), and start over again.
Main Configuration
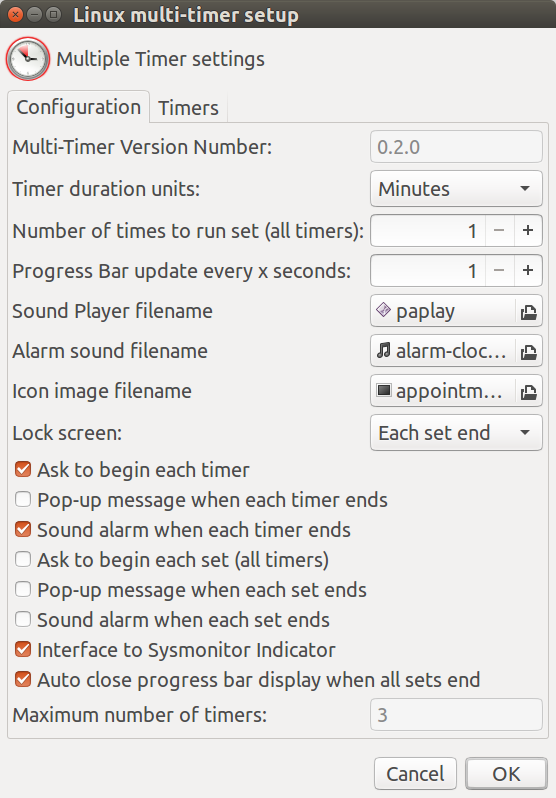
The Main Configuration window, shown on the left, greets you each time you start Multi-Timer. From here you can change the configuration.
When done click OK to begin running timers or, click Cancel to exit Multi-Timer.
To switch to the Timers tab, click it at the top right. The Timers tab is discussed in detail in the next section.
Although there are many options on the Main Configuration tab, don’t be intimidated. The options are pretty straight forward.
It is important to note two options are “greyed out” and, cannot be changed. Those two options are; Multi-Timer Version Number and Maximum number of timers.
As mentioned in the One-Time Configuration section above, the only way to change the Maximum Number of Timers is to erase the configuration file and start again.
The changeable options on this window are:
- Timer duration units - Choose between “Minutes” and “Seconds” as the unit of measure for timers.
- Number of times to run set (all timers) - Normally you just want to run a job once in a session. But you can repeat the same job multiple times with this option.
- Progress Bar update every x seconds - Number of seconds between updating timer progress bars. The default “
1” is appropriate in most circumstances. - Sound Player filename - Enter the command to play sounds. The default is
paplay(PulseAudio) which is suitable for most Linux systems. On some Linux systems PulseAudio isn’t installed so use theaplaycommand. - Alarm sound filename - Choose a sound file at least 5 seconds long. About 7 seconds is best.
- Icon image filename - Choose the Icon which appears on windows and the task bar of running applications.
- Lock screen - Choose whether or not the screen should lock. Generally this should be set to “Never”.
- Ask to begin each timer - When checked, Multi-Timer prompts to start each timer. Usually, you want this checked.
- Pop-up message when each timer ends - When checked, a notification message (pop-up bubble message) is displayed. Usually, you leave this un-checked because an alarm already sounds.
- Sound alarm when each timer ends - When checked, the alarm sound specified above is played. Usually, you want this checked.
- Ask to begin each set (all timers) - When checked, Multi-Timer prompts to start each set of timers. Usually, you want this un-checked.
- Pop-up message when each set ends - When checked, a notification message (pop-up bubble message) is displayed. Usually, you leave this un-checked.
- Sound alarm when each set ends - When checked, the alarm sound specified above is played. Usually, you want this checked.
- Interface to Sysmonitor Indicator - When checked, Multi-Timer records time remaining to the
~/.lock-screen-timer-remainingfile. See interface to Sysmonitor Indicator below. - Auto close progress bar display when all sets end - When checked, Multi-Timer simply disappears when all timers end. If un-checked, the progress display remains on-screen at 100% until manually closed.
Timers Configuration
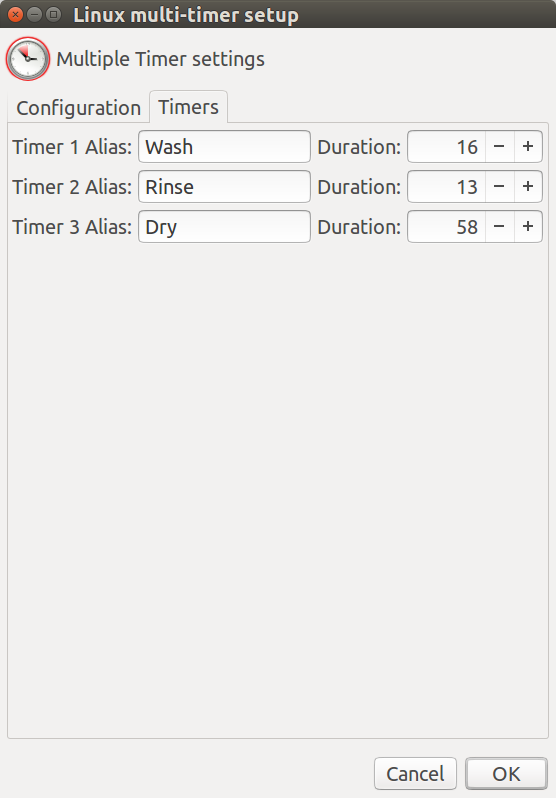
When you click the Timers Tab a window similar to the one on the left appears.
Initially all the Aliases are set to “Timer 1”, “Timer 2”, “Timer 3”, etc., all the way up to the Maximum Number of Timers.
The Alias that you enter is used in the Progress Display.
Initially, all the Durations are set to 0. You can have
as many 0 durations as you like. However, there must be at
least one non-zero duration to make up a valid set of timers.
Any timers with a duration of “0” will not be displayed in
the progress bars.
You can key in the Duration number directly. Or, click + to increment by a value of 1 and, click - to decrement by a value of 1.
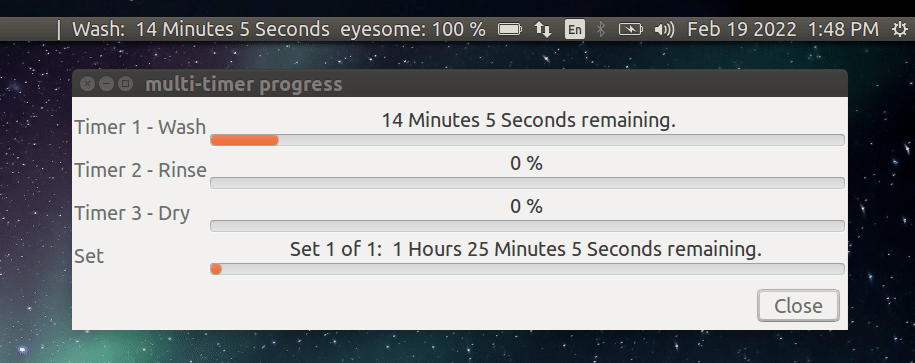
In this example the first Alias is “Wash” and the Duration is
set to “16”. In the Configuration Tab the units of measure
were set to “Minutes” so the duration of the “Wash” timer
is 16 minutes.
Next is the “Rinse” timer at 13 minutes. Finally, the
“Dry” timer is set to 58 minutes.
Installing Multi-Timer
You can download the Source Code from GitHub but that is a complicated process for a single file.
The easiest way is to open the raw code on GitHub.
Then use:
- Ctrl + A to select all text
- Ctrl + C to copy all text to clipboard
- Open the terminal with Ctrl + Alt + T
- Run
gedit mt - Ctrl + V to paste text from clipboard
- Save the file and exit gedit.
- Flag the file as executable using
chmod a+x mt
Voila! You have just installed mt to your home directory.
Now to run Multi-Timer you need to always specify the program
is located in your home directory. See the next section to move
Multi-Timer to a directory in your path so you do not have to
specify where mt is located.
Move Multi-Timer into PATH
In order to call Multi-Timer from any directory with the mt command
you will want to move the program into your path.
A good place for all users is /usr/bin.
A good place to use Multi-Timer just for yourself
is ~/bin. Because ~ is shorthand for /home/<YOUR USER NAME>,
the ~/bin directory under your home user name. By default,
you do not have a ~/bin directory under your home user name. So you
will need to use:
mkdir ~/bin
NOTE:
After creating the
~/bindirectory you will need to close the terminal and reopen it.
To verify the new directory is in your path use:
echo $PATH
The very first directory will be /home/<YOUR USER NAME>/bin.
Now move the mt program from ~/mt to ~/bin/mt using:
mv ~/mt ~/bin/mt
Now you are all set to call mt from any directory!
Optionally Modify Multi-Timer Source Code
The source code (Bash Script) can easily be changed by anyone with moderate knowledge of the Linux Shell. You can view the full source code here,
If you wish to change the source code, here are the likely places you want to change:
# Running under WSL (Windows Subsystem for Linux)?
if grep -qE "(Microsoft|WSL)" /proc/version &> /dev/null ; then
    fWindows10=TRUE
    SoundPlayer=""
    DefaultSound="C:\Windows\media\Ring05.wav"
    TitlePrefix="Windows 10"
else
    fWindows10=FALSE
    SoundPlayer="/usr/bin/paplay"
    DefaultSound="/usr/share/sounds/freedesktop/stereo/alarm-clock-elapsed.oga"
    TitlePrefix="Linux"
fi

DefaultIcon="/usr/share/icons/gnome/48x48/status/appointment-soon.png"
sIconFilename="$DefaultIcon"    # Give default until configuration read in
MAX_TIMERS=10                   # Default when creating configuration
IMPORTANT NOTE:
Version 0.2.0 was released on February 19, 2022 and not tested with WSL (Windows Subsystem for Linux).
Dependencies
Here are the dependencies you ned to install for mt.
sudo apt update
sudo apt install yad
sudo apt install libnotify-bin
Create a Second Configuration File
Lets say you want a second Multi-Timer Configuration file
for another project. Enter these commands from the terminal (The #
comments are not necessary but will not effect operations):
cd ~/.config                  # Go to user's configuration directory
cp mt.conf mt_laundry.conf    # Copy Multi-Timer configuration file
rm mt.conf                    # Remove Multi-Timer configuration file
mt                            # Run Multi-Timer as if first time
This saves the current configuration as mt_laundry.conf and runs
Multi-Timer as if it were the first time.
The copy command (cp) and remove command (rm) can be combined into
a single move command (mv) to rename the configuration file:
cd ~/.config                  # Go to user's configuration directory
mv mt.conf mt_laundry.conf    # Rename Multi-Timer configuration file
Increasing Maximum Number of Timers
Lets say you created your configuration with the Maximum Number of Timers for your laundry job set to 3 for:
- Wash
- Rinse
- Dry
Then you decided you wanted to add another timer for folding your clothes. The conventional method is to simply delete the configuration file (as described in the previous section) and create a new configuration.
There is another option though. YOu can actually edit the
configuration file using gedit or another editor. For example,
type gedit ~/.config/mt.conf and you will see:
| 0.2.0 | Minutes | 1 | 1 | /usr/bin/paplay | /usr/share/sounds/freedesktop/stereo/alarm-clock-elapsed.oga | /usr/share/icons/gnome/48x48/status/appointment-soon.png | Each set end | TRUE | FALSE | TRUE | FALSE | FALSE | FALSE | TRUE | TRUE | 3 | Wash | Rinse | Dry | 16 | 13 | 58 |
The pipe character (|) separates fields in the configuration file.
Notice the end of the line contains:
TRUE|3|Wash|Rinse|Dry|16|13|58
The 3 indicates the maximum number of timers. This is followed
by the timer aliases: Wash, Rinse and Dry. Next comes
the timer durations in minutes: 16, 13 and 58.
To change to four timers you would change them to:
TRUE|4|Wash|Rinse|Dry|Fold|16|13|58|10
The 4 indicates the maximum number of timers. This is followed
by the timer aliases: Wash, Rinse, Dry and Fold. Next comes
the timer durations in minutes: 16, 13, 58 and 10.
But while you are add it why not add some extra spare fields?
TRUE|6|Timer 1|Wash|Rinse|Dry|Fold|Timer 6|0|16|13|58|10|0
You’ve just successfully created timer aliases Timer 1 and
Timer 6 with a duration of 0 minutes which means they
will never display and never get executed. If you ever want to
activate them just use the regular Main Configuration Tab in
Multi-Timer program.
Future Plans
A web version where you can run Multi-Timer on any web browser on any platform anywhere in the world.
The configuration file is stored on your web browser local storage in the form of a Cookie.
A function to copy and paste your cookie into an email. Then send it to yourself and receive it. Then paste the cookie onto another web browser on your device. Or paste the cookie into a different device. Or share your e-amil cookie with a friend / colleague and they can run your Set of Timers.
Perhaps some day Pippim will have a special page of the most popular Multi-Timer cookies that people can run.
Gone will be the notion of Maximum Number of Timers. You can have an infinite amount depending on RAM. You can scroll and insert a new timer anywhere in the set. You can highlight a timer and click the Trash Bin. After confirmation all timers below simply move up the list.
It will be easier to let you link the timer alarm to a YouTube video instead of just a simple audio file.
The future can be revolutionary… or at the vary least evolutionary because Cookies have existed for a long time, just never something end-users were allowed to use for their own personal gain.